Category Archives: Blog

recognize a concussion

How To Recognize A Concussion

recognize a concussion
Sometimes accidents happen. Whether you are a pro or novice athlete on the field or just your average human navigating earth. Concussions can and do happen to anyone; small children that have had an injury at the playground, drivers in car accidents, and the elderly who have experienced a fall, are all potentially at risk for concussions. It’s important to be able to recognize the signs of a concussion and take proper action.

In a definition provided by the CDC, a concussion is a type of traumatic brain injury (TBI), caused by a blow to the head or body that causes the brain to move rapidly inside the skull. Even a “ding,” “getting your bell rung,” or what seems to be a mild bump or blow to the head can be serious.

Common symptoms for someone experiencing a concussion include:

  • Difficulty thinking clearly or concentrating
  • Headaches
  • Fuzzy or blurred vision
  • Nausea or vomiting
  • Dizziness & balance problems
  • Sensitivity to light and/or noise
  • Lethargy
  • Irritable or sad
  • Nervous or anxious
  • Irregular sleep patterns

If a person shows extreme symptoms, it’s important to take them to the emergency room immediately. These include:

  • Unconscious or have had a brief loss of consciousness
  • One pupil larger than the other
  • Having convulsions or seizures
  • Cannot recognize people or places
  • Unusual behavior
  • Headache that gets worse and does not go away

More information for parents:

Child has a possible concussion

In every scenario, it is important to receive an accurate diagnosis from a healthcare professional. Physical therapy can play an important role in monitoring the healing process after a concussion has occurred. As physical therapists, we are trained in the step-by-step process of monitoring the post-concussed patient, and safely returning them to their previous activities. Getting diagnosed and seeking medical attention immediately is crucial to a healthy recovery. For more information about concussions visit www.cdc.gov/headsup and our page on concussion recovery.

physical therapy near me

fall prevention at home

Fall Prevention: Fall Risks & Tips in your home

fall risks prevention tips at home

While falls can happen anywhere, more than half occur in the home. One in every three adults 65 and older fall AT HOME each year in the U.S. One of the easiest ways to help prevent a fall is to make sure that specific tripping hazards are addressed and removed. We’ve compiled a short list below to help you get started.

physical therapy near me

COMMON WARNING SIGNS FOR FALLING ARE:

  • Feeling pain or stiffness when you walk
  • Needing to walk slower or to hold on to things for support
  • Feeling dizzy or unsteady when you get up from your bed or chair
  • Feeling weak in your legs
  • You take more than one medication
  • You have problems seeing
  • You have had at least one fall in the past year

RISKS TO CONSIDER WHEN FALL-PROOFING YOUR HOME:

Lighting

  • Is the lighting adequate, especially at night?
  • Are stairwells well-lit?
  • Is there a working flashlight in case of power failure?
  • Can lights easily be turned on even before entering
    a dark room?

Surfaces

  • Are there any wet surfaces that are frequently wet?
  • Are steps and stairs in good repair and the
    appropriate rise?
  • Do steps have handrails in good repair?

Trip Hazards

  • Are there throw rugs in the walking path?
  • Does the family pet often sleep in walking paths?
  • Is the carpet in good repair without tears or fraying?
  • Are there extension cords or raised door sills in the walking paths?
  • Is there a clear path from the bed to the bathroom?

If you feel that you are at risk for falls, talk to your physical therapy provider. Most physical therapy clinics offer fall risk assessments that can help determine any areas of risk. By participating in a fall prevention program, you can reduce the likelihood of a fall and increase the ability to live independently. Fall prevention programs mainly focus on core strength, flexibility, and patient education.


Physical Therapy Appointment

FLYR_FallPrevention_HomeFalls fall risks

For more information about balance and fall prevention click the links below:


fall risks    fall risks
Top 5 Exercises for Frozen Shoulder

Top 5 Exercises For A Frozen Shoulder

Top 5 exercises for a frozen shoulder: Frozen shoulder exercises

Adhesive capsulitis is more commonly known as frozen shoulder, and with good reason: It can render your shoulder so stiff, that it’s almost impossible to button your shirt — that is, if you aren’t in too much pain to get dressed in the first place. In general, a frozen shoulder can come on after an injury to your shoulder or a bout with another musculoskeletal condition such as tendinitis or bursitis. Quite often its cause can’t be pinpointed. Nonetheless, any condition that causes you to refrain from moving your arm and using your shoulder joint can put you at risk of developing frozen shoulder.

Physical therapy exercises for frozen shoulder focus on controlling pain and getting movement back to normal through physical therapy. When trying out the exercises below please perform them to your tolerance. If you experience pain – stop immediately.

Exercises For A Frozen Shoulder

1. Internal Rotation Belt Stretch.
Exercises for Frozen Shoulder Internal Rotation Belt Stretch

Grab an old belt or dog leash. Place the involved hand behind your back and start by pulling the belt across your buttocks. Hold for 5-10 seconds. Repeat for 1 minute 2 sets.
Progression: Place the involved hand behind your back and pull the belt with the non-involved to progress the backhand upward along the spine. Repeat for 2 minutes.

2. Posterior capsule stretch
Exercises for Frozen Shoulder Posterior Capsule Stretch

Cross your involved arm across your chest and apply overpressure with your non-involved side. Hold for 1 minute, 2 repetitions.

3. Pectoralis Stretch
Exercises for Frozen Shoulder Pectoralis Stretch

Stand in a door frame with arms by your side. Clasp onto the door frame and take a few steps forward until a stretch is felt in your bicep and shoulder area. Hold for 5-10 seconds for 1 minute, 2 repetitions.

4. Sleeper stretch
Exercises for Frozen Shoulder Sleeper Stretch

Roll onto your involved shoulder. Place your elbow in line with your shoulder. With your non-involved side, push your forearm down towards the floor. Hold for 30 seconds, 3 repetitions.

5. Upper thoracic stretch
Exercises for Frozen Shoulder Upper Thoracic Stretch

Stand about arm’s length away from a staircase banister or kitchen sink. Hold onto the banister and lean your body forward until a stretch is felt in your upper shoulders and back. Hold for 1 minute, 2 repetitions.

These exercises while designed to help a patient experiencing frozen shoulder may not be beneficial to patients during all stages of recovery. For the best results, please find a physical therapist in your area to schedule an appointment. They will be able to tailor a treatment program designed specifically to meet your needs and ability levels.

Frozen Shoulder

physical therapy near me

These exercises for frozen shoulder were compiled and demonstrated by the staff at Green Oaks Physical Therapy – Irving. Green Oaks is located throughout the greater Dallas and Fort Worth areas. More information about Green Oaks physical therapy can be found here.

Healthy After School Snacks

Healthy After School Snacks

Healthy After School Snacks

Once your child comes home from school, they are ready to eat everything in sight. After a full day of learning, moving, and having fun, it’s completely normal for kids to feel hungry the moment they walk through the front door. Most school lunches happen early, so by the end of the day, it has been hours since their last meal. Add in limited time to eat, small portions, and picky appetites, and it’s no wonder they come home starving!

What are some Healthy After School Snack Ideas for Growing Kids?

Rather than letting them reach for snacks that are not the healthiest, having ready-to-go snacks is the best strategy. We’ve put together a few snack options to keep in your fridge or to send with them to have on the bus ride back home.

High-Protein Snack

Egg wraps are a great way to get a good amount of protein. Each egg contains approximately 6 grams of protein. Combine it with a slice of deli meat, such as ham, and a slice of cheddar cheese, and you have a total of about 18-20 grams of protein! Fry a scrambled egg on a griddle, lay a slice of ham, and sprinkle some cheese. Once cooked, transfer to a plate to roll the layers into themselves to make a flute-like egg omelette. This easy-to-make snack will work for any part of the day.

Brain Food Snack

We’ve known that berries and walnuts are great for brain health, but have you considered serving tuna for brain health? Tuna is rich in DHA, a type of omega-3 fat that plays a key role in brain development and function. It’s easy to mix into kid-friendly snacks like tuna salad with whole-grain crackers or a tuna melt. Make sure to look for the “mercury tested” label!

After-Sports Practice Snack

After running, jumping, and giving it their all at sports practice, kids need the right fuel to recharge. A smoothie is a quick, delicious, and nutritious way to do just that. The smoothie recipe below offers anti-inflammatory power from blueberries, carbohydrates from milk, and protein from peanut butter, as well as the milk. Feel free to add extra ingredients!

  • 1 ½ cups of frozen blueberries
  • 1 cup of milk of choice
  • 5 tablespoons of peanut butter
  • 12 ice cubes
  • ¾ cup of water
  • Honey to sweeten

Snack for the Munchies

Popcorn is an easy fix when your toddlers or teens just want to munch on something. There are so many ways to season or dress up this snack, from adding a cheesy seasoning to drizzling some dark chocolate mixed with dried strawberries. It is a healthy whole grain option, offering a good amount of fiber and low in calories. Skip the microwave bag and pop ¼ cup of kernels on the stovetop with the help of a tablespoon of avocado oil.

Snack for Growing Bones

Cottage cheese may be simple, but it is the perfect snack for kids with growing bones. It is rich in calcium and phosphorus, which work together to build strong bones, and just half a cup provides 13-14 grams of protein. It checks all the boxes! You can blend it into a dip or use it to make muffins for those ever-hungry children.

These healthy after school snacks can help your children focus when it’s time for homework, prevent overeating during dinner time, or help them heal from an injury. If your child is active or participating in physical therapy, a healthy snack can help them show up energized and ready to move.

physical therapy near me

Written by Vanessa Delgado, B.S. in Human Nutrition and Foods

PT News PTandMe

PT News July 2025

PT News PTandMe

This time in PT News, we recap what our clinics have been posting throughout July 2025. We are excited to bring you current physical therapy-based posts featuring published articles from PTandMe partnering clinics!

physical therapy near me

Swimmer Shoulder Physical Therapy

1. Why Swimmers Hurt: Dryland Shoulders and Staying Strong

Written by Advance Rehabilitation, with locations throughout the State of GA. 

“Competitive swimmers experience shoulder injuries at a high rate, with studies reporting that 23% to 51% of swimmers experience shoulder-specific injuries, and 26% to 41% of injuries are shoulder-related. Additionally, 74% of swimmers reported experiencing shoulder pain, with 23% reporting a shoulder injury. This indicates that shoulder injuries are a significant concern among competitive swimmers”…  Read more


neck pain

2. Text Neck: What It Is and How to Prevent It

Written by Four Pines Physical Therapy, an outpatient physical therapy practice in Jackson, Alpine and Pinedale, WY.

For each inch your head moves forward beyond its natural position, the pressure on your spine rises by about 10 pounds. In some cases, a severe forward tilt can add up to 60 pounds of extra force, leading to tension and pain in the neck, shoulders, and upper back. Even everyday activities like reading a book can contribute to Tech Neck if done with improper posture. Over time, maintaining this position places excessive strain on the cervical spine and muscles, potentially causing…  Read more


TX has direct access to physical therapy

3. Texas Direct Access Just Got Better

Written by Momentum Physical Therapy an outpatient physical therapy group located throughout the Greater San Antonio, TX.

Governor Greg Abbott has officially signed House Bill 4099, bringing a major win for patients and physical therapists across the state. Starting September 1st, licensed physical therapists in Texas will be able to treat patients without a referral for up to 30 calendar days. Previously, physical therapists in Texas could only treat patients for 10–15 business dayswithout a referral, depending on their license level. What does this mean for youRead more

We hope you enjoyed our picks for the PT News July 2025 edition.

Find these locations and others to start feeling better today!

Physical Therapy Appointment

Better Sleep in Any Position – Physical Therapist Tips

How to Get a Better Night's Rest in Your Favorite Sleeping Position

Physical Therapy Appointment

Healthy Sleeping Tips

Snuggling up for a snooze-fest isn’t just for dreaming about sheep – it’s the best way to help protect your mental health, physical health, and quality of life. For many, getting a good night’s rest doesn’t come by so easily. Tossing and turning throughout the night can lead to exhaustion throughout the day, and the repercussions of poor sleep ripple through every facet of one’s well-being, emphasizing the crucial importance of prioritizing healthy sleep habits.

The National Institutes of Health suggests that school-age children need at least 9 hours of sleep daily, teens need 8-10 hours, and adults need at least 7 hours.

Everyone tends to have their preferred go-to sleep position that always helps them drift into slumber. For some, it’s the classic back position; others find comfort curling up on their side, and some prefer sleeping on their belly.

Sleeping for hours on end in the same position can have its pitfalls if your body is not properly supported. While favorite sleep positions differ, some key principles apply to almost everyone. See which sleeper you tend to be, and think about the tips that apply:

How to Get a Better Night’s Sleep in Your Favorite Position

The Side Sleeper

Put a pillow between your legs to get alignment for your hips to your knees, and make sure the pillow you rest your head on provides alignment with the height of your spine

The Back Sleeper

Make sure the pillow under your head is not too high and provides support for your neck so that your head and your spine are in alignment. If you find that there is pain in your lower back from the curvature of your body, you can put a pillow under your legs to lessen the curvature in your back and relieve stress

The Stomach Sleeper

Not recommended for long periods. This position overextends your neck because it forces you to turn your head to the side while the rest of your body faces the bed. Your arms may also be over-extended if you have them above your head, causing stress to your back

Choosing the Right Pillow

While there are many things you can do to try to get a good night’s rest, the solution may be lying right beneath your head. A pillow that adequately supports the head helps maintain proper spinal alignment, and prevents stiffness and soreness in the neck & shoulders, minimizing discomfort. Proper head support can alleviate issues such as snoring, sleep apnea, and acid reflux by promoting optimal breathing patterns and reducing pressure on the airways.

Here are some factors to consider when you’re out shopping for the perfect pillow:

  • Your ideal pillow should let your head rest so that it’s aligned with your shoulders, hips, and heels, forming a straight line from your head to your body.
  • If your head tilts back (or to one side when side sleeping), your pillow is too thin and may cause stiffness in your shoulders.
  • If your head tilts upward and disrupts the straight line, your pillow is too full or thick. This can reduce the size of your airway, causing you to snore.

Take advantage of the return policy on your pillows and try it out for a few days. If you’re uncomfortable, return it and find another. Keep in mind that the right pillow for you depends on your sleep position(s). Here are some suggestions to get it right the first time!

  • BACK SLEEPERS: Try thinner pillows or pillows with more volume in the bottom third to cradle your neck.
  • SIDE SLEEPERS: Look for a firmer pillow that fills in the space between your ear and shoulder.
  • STOMACH SLEEPERS: Opt for a very thin pillow to keep your back from arching or even sleep without one.

Experiment with different pillows and sleep positions to find what works best for you. Remember, the key is not only in the position itself but also in maintaining proper alignment and providing support where needed.

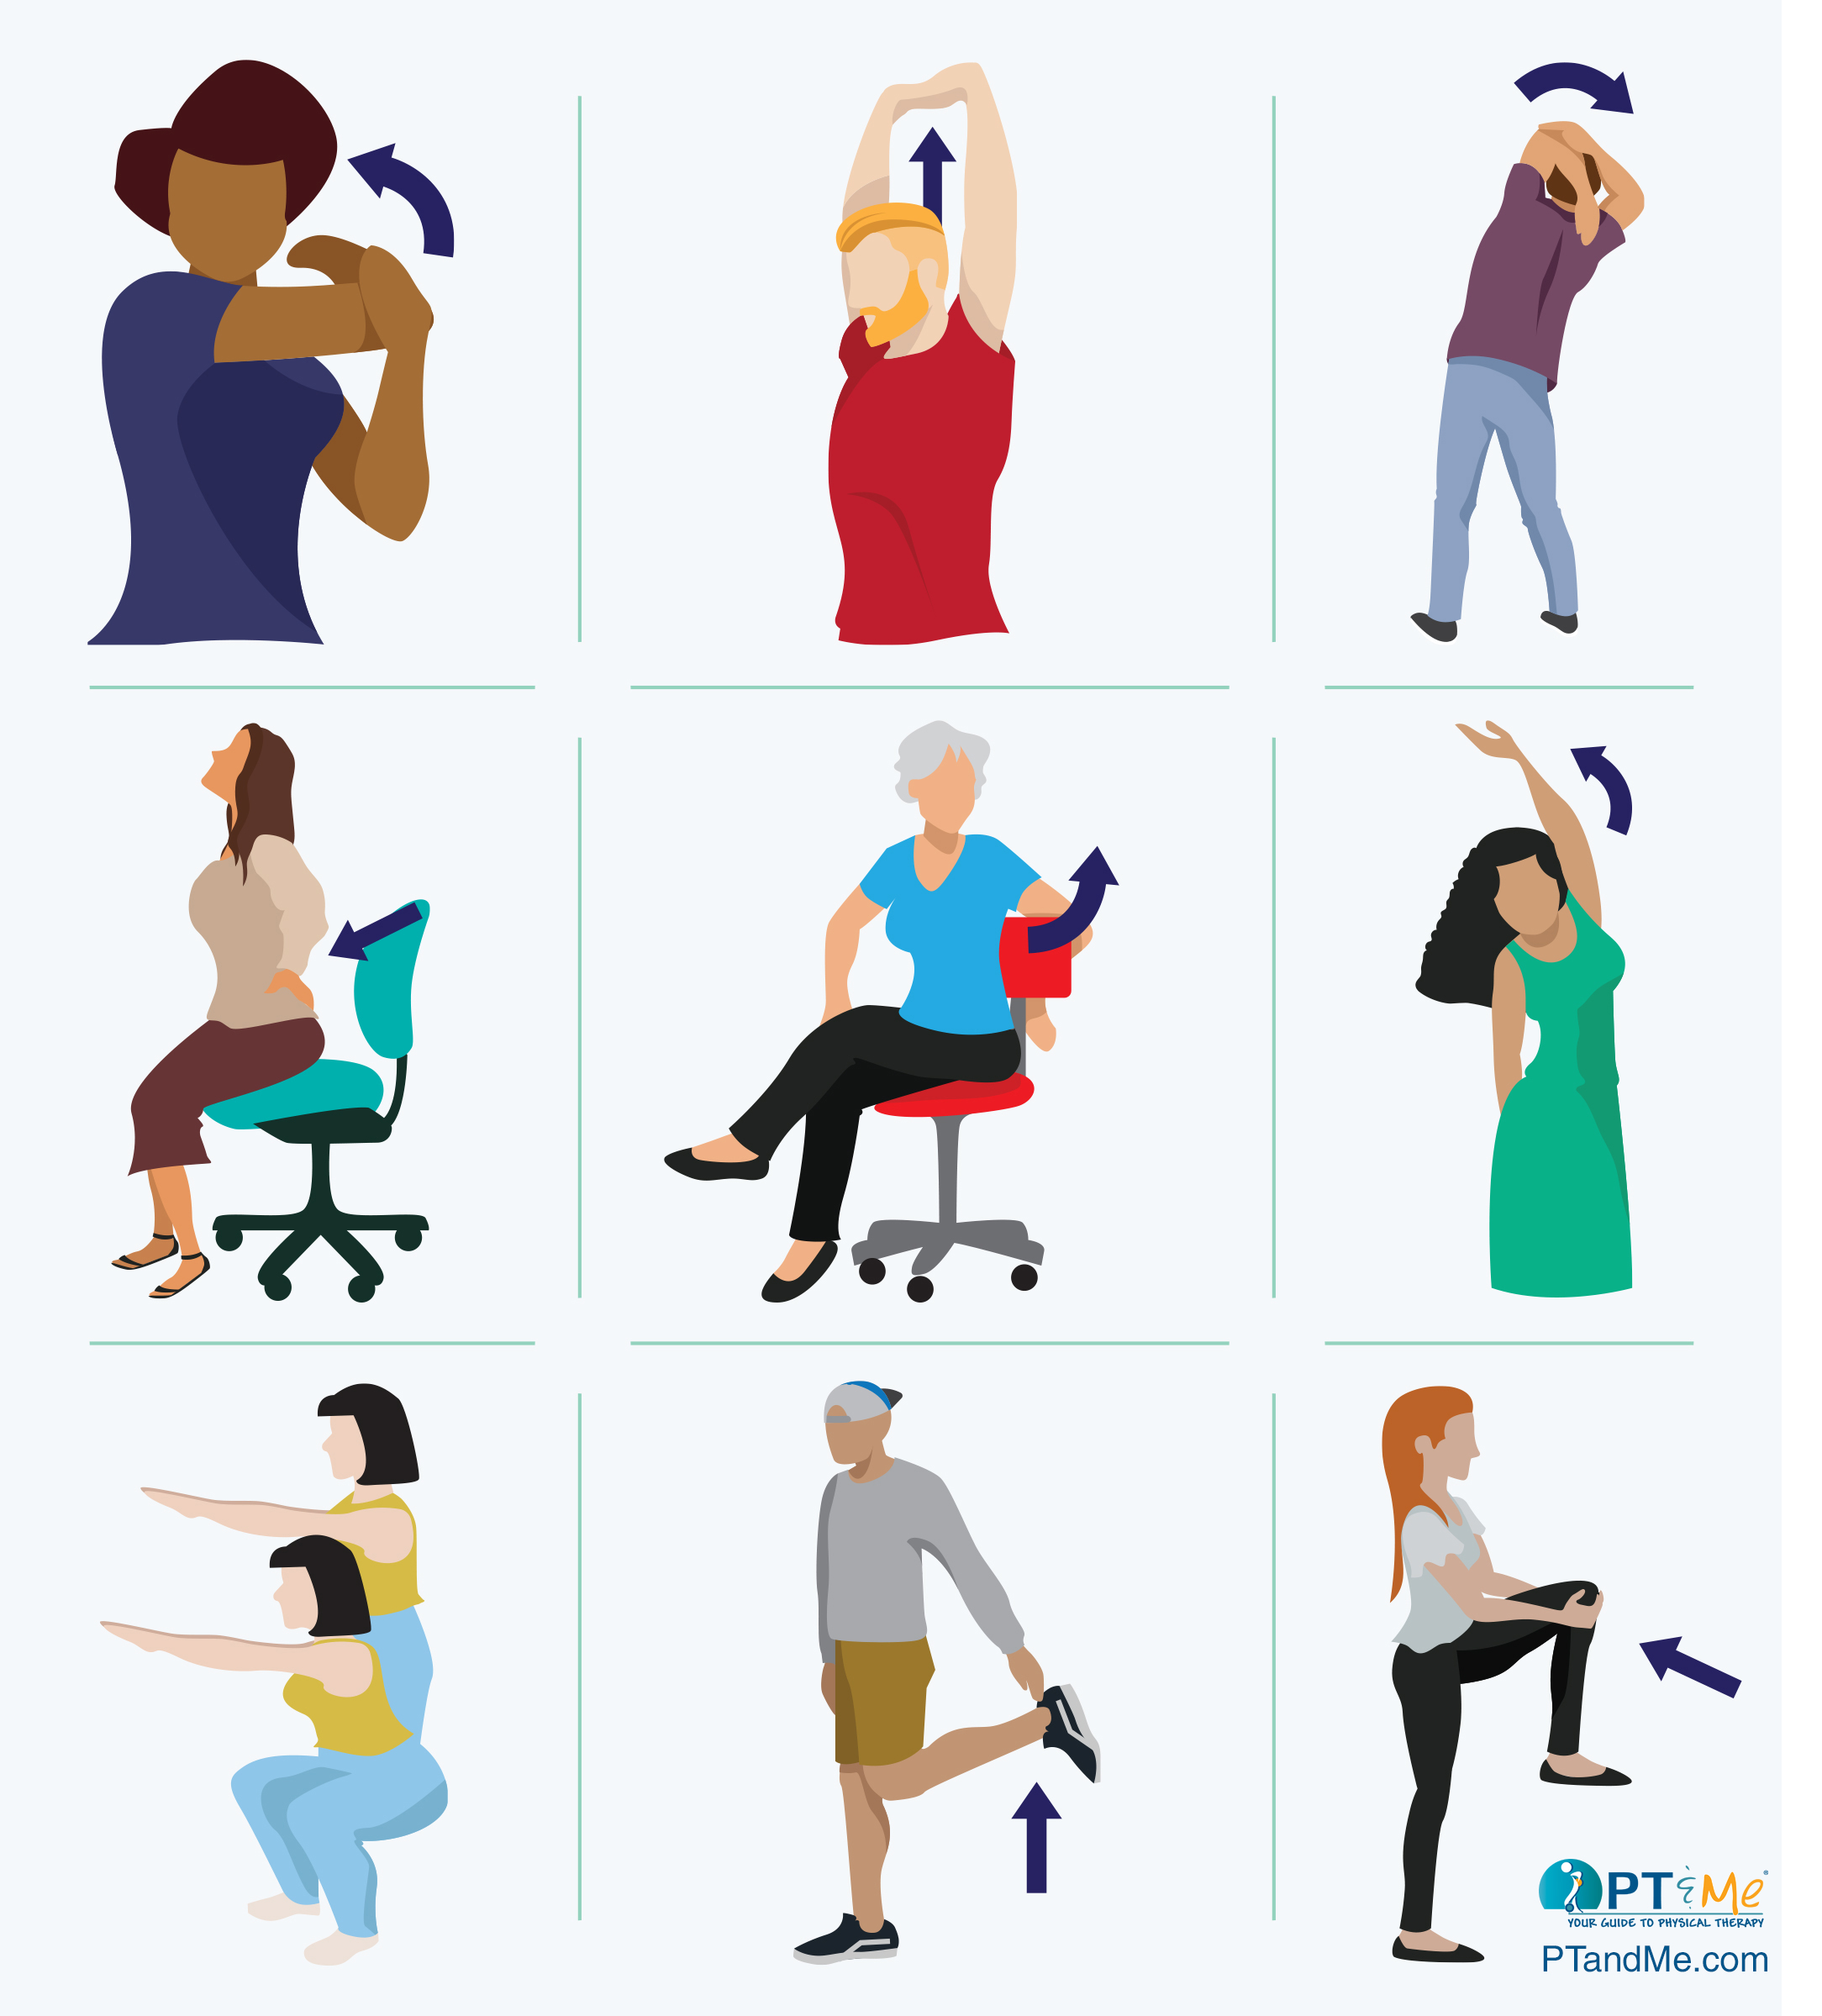
If these tips don’t help you get a better night’s rest in your favorite sleeping position, or if you are experiencing pain, physical therapy should be considered as the next solution. Range of motion exercises may be prescribed by a physical therapist if you have a neck ailment that limits mobility to your shoulder(s) or arm(s). A physical therapist can work with you to help perform these exercises and determine the cause of your pain to allow your body to heal day in and day out. May your nights be filled with sweet dreams and countless sheep and your days with boundless energy, as you embrace these healthy sleeping tips.

Frequently Asked Questions

What is the healthiest sleeping position?

The side‑lying fetal position is widely recommended because it keeps your spine neutral and reduces pressure on internal organs. Use a medium‑firm pillow to fill the gap between your ear and shoulder.

Can the wrong pillow cause neck pain?

Yes. A pillow that is too high or too flat forces your neck out of neutral alignment. Choose a pillow that keeps your ears, shoulders, and hips stacked in one straight line.

How can I stop tossing and turning at night?

Begin with good sleep hygiene—no screens 30 minutes before bed—then use body pillows or a rolled towel to stabilize your trunk and knees so muscles can relax.

When should I see a physical therapist about sleep pain?

If stiffness or pain lasts more than two weeks or disrupts your daily routine, schedule an assessment. A PT can identify mechanical issues and give corrective exercises.


physical therapy near me

office ergonomics

The Ergonomic Workstation

The Ergonomically correct workstation; Ergonomic workstation set up

Physical Therapy Appointment

Having an ergonomic workstation means that your desk and the things on it are arranged in such a way, that they prevent injury and are well within reach and use. An ergonomic workstation also promotes good posture. Posture is the position in which you hold your body upright against gravity while standing, sitting, or lying down. An ergonomically designed workstation promotes good posture and helps to:

  • Keep bones and joints in the correct alignment so that muscles are being used properly.
  • Help decrease the abnormal wearing of joint surfaces that could result in arthritis.
  • Decrease the stress on the ligaments holding the joints of the spine together.
  • Prevent the spine from becoming fixed in abnormal positions.
  • Counter fatigue because muscles are being used more efficiently, allowing the body to use less energy.
  • Prevent strain or overuse problems.
  • Avert backache and muscular pain.

Proper ergonomics plays an instrumental role in how effectively you accomplish work and will help prevent suffering from work-related injuries due to strain and overuse. In the diagram below you will find both sitting and standing workstation recommendations to achieve a proper ergonomic workstation.

seated ergonomic workstation: Ergonomic workstation set up

SITTING: Body position guidelines

  • Lower back supported by a lumbar curve
  • Bottom & Thighs distributed pressure
  • ARMS minimal bend at the wrist
  • The area behind the knee not touching the seat
  • Feet flat on the floor or on a footrest
  • Wrists and hands do not rest on sharp or hard edges
  • The telephone should be used with your head upright (not bent) and your shoulders relaxed (not elevated)


Standing Ergonomics: Ergonomic workstation set up

STANDING: Working Guidelines

  • Precision Work – above elbow height
  • Light Work – just below elbow height
  • Heavy Work – 4-6 inches below elbow height


Setting Up Your Ergonomic Workstation

Video Provided by North Lake Physical Therapy

Physical and occupational therapists have experience working with patients to improve posture and ergonomics. Some clinics have therapists that go into the workplace and arrange a patient’s workplace, making it ergonomically efficient. For more information or to find a therapist near you

physical therapy near me

Stretches you can do at work

Stretches You Can Do at Work

Stretches you can do at work

The past 50 years have revealed that at least 8 out of every 10 are turning into desk potatoes! According to the Mayo Clinic, more than four hours a day of screen time can increase your risk of death by any cause by 50 percent. There’s also a 125 percent risk for cardiovascular disease! But don’t worry, we also have some good news. It can be very easy to reverse these risks- take our advice!

Ways to Reserve the Risks

  • Take a break from sitting every 30 minutes.
  • Use an alarm on your computer, laptop, phone, or Apple Watch to remind you to take a stretch break.
  • Try a standing desk -or improvise with a high table or counter.
  • Try out a new trend called Urban Walking meeting where you walk with your colleagues for meetings rather than sitting in a conference room. You’ll likely be more creative, productive, and have better ideas.
  • If you work from home, position your work surface above a treadmill — with a computer screen and keyboard on a stand or a specialized treadmill-ready vertical desk – so that you can be in motion throughout the day.

Take a moment before the start of your workday, after or before a work break, and before you end the day with a quick stretch. Spending 5 – 10 minutes every hour can help reverse the effects of sitting for long periods of time during your workday.

We have put together a few workplace stretches to help:

  • Enhance Flexibility
  • Improve Circulation
  • Promote Relaxation
  • Decrease Healthcare Costs
  • Promote Awareness of the need for regular exercise

Building the habit of moving so often throughout your day can also lead to better work performance and productivity. A recent study found that 66 percent of participants felt more productive with a one-hour increase in standing time, while 71 percent of people felt more focused.

GET MOVING! But What to Do?

Movement-Break Stretches You Can Do at Work!

Here are some great examples of movements you can try to do throughout your day. Learn them and build a great habit to reap to rewards of a healthy body.

Stretches you can do at work

Perform these stretches 5-10 minutes before the start of work and after any work break of more than 15-30 minutes.  Our talented teams of physical therapists can work with you to create a stretching program that’s specific to the muscle groups you use during your daily work routine. Find one near you today for more information.

Physical Therapy Appointment

Our bodies were made to move! If aches and pains are getting in the way of doing daily activities, take action now and contact us today to work with our team to create a stretching program that can work for your specific situation, and target muscle groups used during your daily work routine.

Looking for More?

Check out these 4 exercises you can do at home while watching TV  Small changes can make a big difference!

Four Exercises you can do at Home

golf stretches

Dynamic Golf Stretches

DynamicGolf_FBsize

Golf requires strength, flexibility, endurance, and power to create pain-free movement and improve your game. The most common golf injury is low back pain followed by shoulder pain and knee pain. A physical therapist can assist you in improving your pain and correcting your body’s deficits.  These golf stretches will make your golf game less painful and reduce those extra strokes:

hamstring stretch

Hamstring Stretch
(move from upright into stretched position 10x)

back extension stretch

Back Extension Stretch
(hold club backwards overhead, repeat 10x)

hip back shoulder rotation

Hip/Back/Shoulder Rotation Stretch
(hold club behind back and rotate torso to each side 10x)

calf stretch

Calf Stretch
(move from upright into stretched position 10x)

lumbar rotation 1

lumbar rotation 2

Lumbar Spine Rotation
(hold club, plant feet as shown, rotate to each side 10x)

forearm rotation 1

forearm rotation 2

forearm rotation 3

Forearm Rotation
(hold club straight up, then rotate to each side 10x)

Physical Therapy Appointment

This information was written by Mishock Physical Therapy and Associates, a privately-owned, outpatient physical therapy practice operating in southeast Pennsylvania. They actively participate in the community by providing services to schools, retirement communities, and local businesses. Their mission is to provide the most efficacious, state-of-the-art physical therapy services to relieve pain, restore function and return you to the highest quality of life possible. For more information click here.

Avoid Spring Cleaning Injuries

Do’s & Don’ts of Spring Cleaning

Avoid Spring Cleaning Injuries

It’s that time of year for cleaning out the cobwebs, de-cluttering, and rearranging our homes. Some of us enjoy the task while others dread it. Did you know that the greatest risk of injury we face is in our own homes? From muscle strains to home falls there is no shortage of things that can go wrong but we’ve compiled a list of tips to help you minimize injury. Follow these spring cleaning safety tips to have a safe and productive spring cleaning!

physical therapy near me

    • 1. Do not rush because you are tired or in a hurry.

This is really the most basic spring cleaning safety tip, and all the other ones, at least to a certain degree, stem from this one. Spring cleaning can be tiring work. Do not forget safety even if you have worked hard all day and want to get done. The better thing to do when you are exhausted is to stop and take a break, drink a glass of water, sit under a nice cool fan, and rest instead of being unsafe.

    • 2. Be careful moving large pieces of furniture and appliances.

Use proper lifting technique, keeping your back straight and lifting with your legs. Also, wear shoes when moving heavy items so you don’t hurt your toes. Finally, if you feel it is just too heavy and you can’t find someone else to do it for you, just don’t move it. It won’t be the end of the world to just clean around it. Always have spring cleaning safety in mind.

When doing a task, such as washing windows, where you need to be on a ladder use extreme caution. Do not lean too far to either side. A good rule of thumb is that your belly button should not go beyond the sides of the ladder. Also, have someone available to hold the ladder steady for you if possible, and make sure before you step on them that the rungs are not wet, and you are wearing non-skid shoes.

    • 4. Be careful when walking on wet surfaces.

This spring cleaning safety tip is really important every time you clean. Everyone knows how easy it is to slip on a wet floor. Make sure you take the proper precautions to keep from falling.
Also, make sure others in your family, including children, are also warned of the wet floor to keep them safe. You may need to block small children’s access to wet floors because they just don’t understand not to run and slide on them.

    • 5. Keep stairs, landings, and walkways clear of boxes, bags, and other clutter.

Spring cleaning is a great time to de-clutter your home, but you need to make sure all the boxes and bags of stuff you are getting rid of don’t cause a safety concern. Make sure you place them outside walkways and especially away from steps and stairs where someone may trip on them.

    • 6. Don’t carry too much stuff at once, especially on stairs.

During spring cleaning you will also probably go up and down your stairs a lot carrying things if you live in a home with stairs. Make sure you keep a hand free to hold onto the stair railing. Also, whether you have stairs or not, always make sure you can see over the load you are carrying so you do not trip.

If you are experiencing pain or injury please reach out to a physical therapist. They can evaluate your pain and provide corrective action to help you feel great!

Physical Therapy Appointment