This time in PT News we recap what our clinics have been posting throughout Sept/October 2021. We are excited to bring you current physical therapy-based posts featuring published articles from PTandMe partnering clinics!
Do you have a deep ache or weird sensation in the shoulder, elbow, or hand? Does it come and go? Does it get worse when you stay in one position for too long, sometimes spreading into other areas? Do you massage or “shake it out” to get relief? Check the neck! Read more
Welcome to the blog and video series of my marathon training! I want to preface that this series will not be a detailed training plan, but a combination of reflection, describe shared principles in rehab and running, and a showcase of the clinician talent at CPR. Read more
3. Pulled Groin or Sports Hernia? How to Tell the Difference
Written by O.S.R. Physical Therapy, an outpatient physical therapy group with 4 locations in MN.
It’s one of the most painful moments of any athlete’s life. Doing a fast cut-over during practice or twisting too much to avoid another player, suddenly you feel a sharp pain in your inner thighs and up into your groin. Clearly, you’ve strained your groin – but, is this strain just a pulled groin or sports hernia?… Read more
We hope you enjoyed our picks for the PT News October 2021 edition.
Find these locations and others to start feeling better today!
This time in PT News we recap what our clinics have been posting throughout March 2019. We are excited to begin a new year of new posts featuring published articles from PTandMe partnering clinics!
1. What Triggers Trigger Finger? Written by Rebound Physical Therapy with physical therapy locations throughout Bend, OR and the surrounding areas.
Trigger Finger seems to be a diagnosis many people are familiar with but not actually sure what the diagnosis entails and what can be done to prevent or treat it. Read more
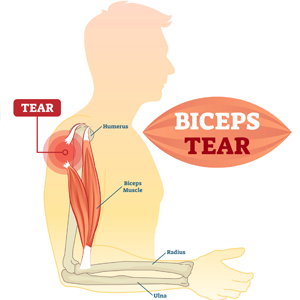
2. Patient Regains Use of Arm After Biceps Tear Surgery Written by the Therapy Team at Ability Rehabilitation with multiple physical therapy locations throughout Central Florida.
After his biceps tendon repair surgery, Rob’s right arm was in a fragile state; it was locked at the elbow and Rob was fearful of moving it and causing further injury. Read more
3. Physical Therapists Undergo Pain Neuroscience Education Written by the physical therapy team at ARC Physical Therapy+ with locations across Kansas, Missouri and Iowa.
Evidence has shown that neuroscience educational strategies focused on teaching people in pain more about the biological and physiological processes involved in their pain experience, changes patient beliefs regarding their pain, thus reducing the threat of pain. Read more
One of the most common mechanism of injury from falls is called a FOOSH (Fall on an Out Stretched Hand) injury. Don’t let the funny name fool you. A FOOSH injury is one of the most debilitating ways to injure your upper extremity and cause a significant loss of function. A Foosh occurs when a person is on their way down during a fall and tries to brace for impact using their hands. This is a natural response to falling and is difficult to try and prevent. The resulting impact of the hand and wrist on the ground can cause varying types of injuries from strains and sprains to fractures of the hand, wrist, elbow or shoulder.
What to look for if you experience a FOOSH Injury
1. Fractures: Typically, the fractures of the forearm from a FOOSH are the easiest to spot. They become swollen and bruised very rapidly and are associated with a lot of pain. Often times they produce a visible bulging of the skin of the forearm which can even protrude outside of the body. Fractures of the wrist and forearm will need to be evaluated and often times re-set and casted. Following casting the person must regain strength and range of motion through a guided exercise program before normal function can return. These injuries may take as long as 12 weeks to heal, but as many as 20 weeks for return to normalcy. This process can be expedited significantly by a referral to a well-trained physical therapist.
2. Sprains: Sprains from a FOOSH are much more difficult to spot. A sprain is a common injury to a ligament that normally holds one bone to another as a part of a joint. It most likely causes moderate to severe swelling, bruising, and pain. The pain may occur both by moving the joint yourself or having someone else move the joint while you are relaxed. During a sprain, a non-contractile piece of tissue becomes torn partially or completely. The result is a joint that is too lax to allow proper joint stability. This can cause problems for years following the initial injury. Think of the brake system on your bicycle. If the brake cable becomes elongated the brake does not function correctly until it is repaired. An evaluation by a physical therapist is necessary to diagnose and treat a sprain correctly and to prevent further injury to the injury site as well as allow for speedy recovery.
3. Strains: Strains are also difficult to spot following a FOOSH. A strain differs from a sprain in that it occurs as a tearing of the tendon instead of a ligament. This can present like a sprain with swelling and bruising, but will have a few different characteristics. Tendons attach to bone on one side and a muscle on the other. Tendons therefore hurt with both passive motion, but also with active motion. Strains of the wrist and hand can cause a significant loss in function with things like writing, typing, or even just holding an object in your hand. Without intervention, this can lead to progressively worsening problems like tendonitisand carpal tunnel syndrome which may need surgical intervention if not attended to quickly.
No matter your age or fitness level please use caution to avoid these types of debilitating injuries. If you do fall, it is important to consult your health care provider. During rehabilitation we can help you reduce pain, increase strength and regain function. Please feel free to call us for more information or to schedule an appointment.
In this third intallment of our series to prevent throwing injuries, we examine the proper ways to exercise and prevent throwing injuries in baseball. If you have any sudden significant increase in pain, swelling, or discoloration while performing or following exercise, discontinue immediately and contact your primary care provider.
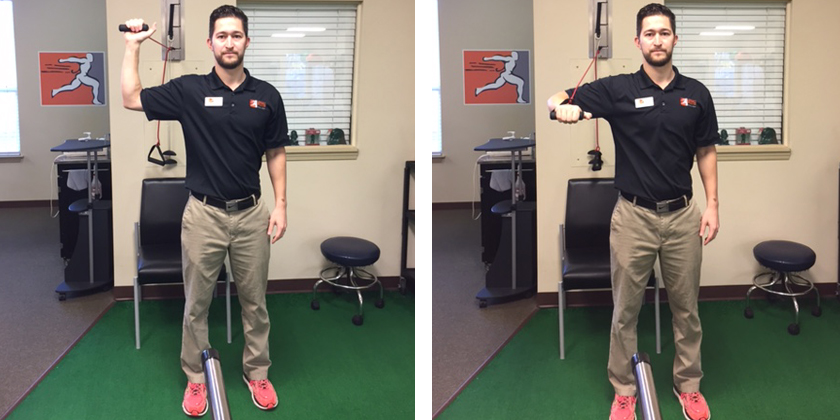
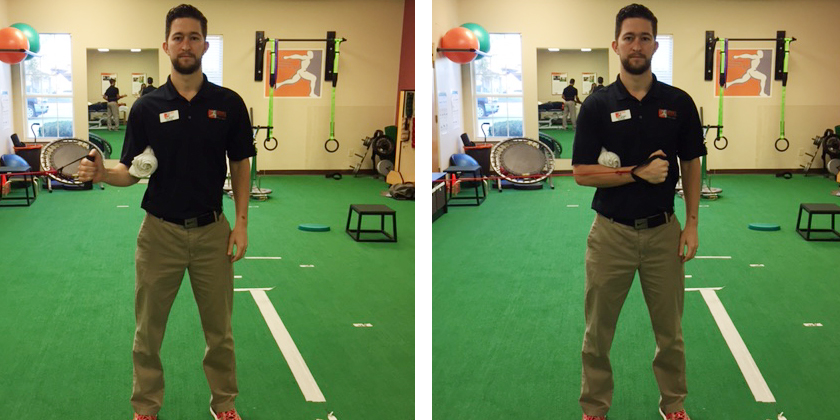
INTERNAL ROTATION WITH SHOULDER AT 90 DEGREES OF ABDUCTION
Attach band high up on a doorway and face away from door. Hold band and move your arm out sideways away from your body until your arm is parallel with the ground. Bend your elbow to 90 degrees and point your fist toward the ceiling. Rotate from your shoulder bringing your hand forward while keeping your arm parallel to the floor and your elbow bent to 90 degrees.
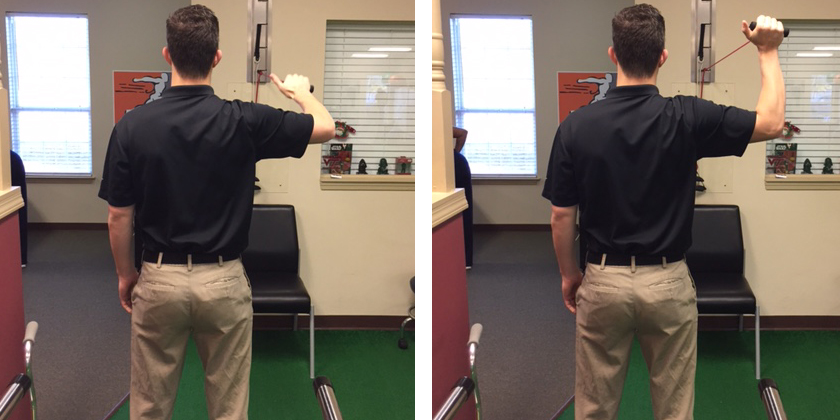
EXTERNAL ROTATION WITH SHOULDER AT 90 DEGREES OF ABDUCTION
Attach band high on a doorway and face toward the door. Hold band and move your arm out sideways away from your body until your arm is parallel with the ground. Bend your elbow to 90 degrees and point your fist toward the door. Rotate from your shoulder bringing your hand away from the door while keeping your arm parallel to the floor and your elbow bent to 90 degrees.
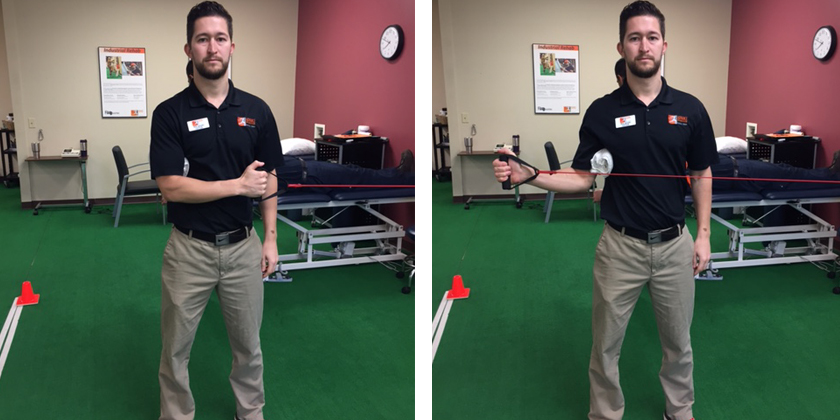
SHOULDER INTERNAL ROTATION AT SIDE
Attach band to the doorway at chest height. Stand perpendicular to the doorway with the arm you are exercising closest to the door. Keep your arm at your side with a towel roll under the arm and bend the elbow to 90 degrees. Bring your hand toward your stomach while keeping the elbow bent to 90 degrees.
SHOULDER EXTERNAL ROTATION AT SIDE
Attach band to the doorway at chest height. Stand perpendicular to the doorway with the arm you are exercising furthest from the door. Keep your arm at your side with a towel roll under the arm and bend the elbow to 90 degrees. Bring your hand away from your stomach while keeping the elbow bent to 90 degrees.
This information was written by Advance Rehabilitation Physical Therapy, an outpatient physical therapy group with 24 locations in Georgia and Florida. Advance Rehabilitation is a physical therapy practice that focuses on providing the highest quality rehabilitation services. We specialize in physical therapy, sports medicine, industrial rehabilitation and athletic training. Our staff includes highly-trained professionals that serve as a bridge between injury and recovery to help patients get back to pre-injury status as quickly as possible. For more information click here.
See the entire Guidelines to Prevent Throwing Injuries series here:
In our second installment of “Guidelines to Prevent Throwing Injuries” we examine the proper ways to exercise and prevent throwing injuries in baseball. If you have any sudden significant increase in pain, swelling, or discoloration while performing or following exercise, discontinue immediately and contact your primary care provider.
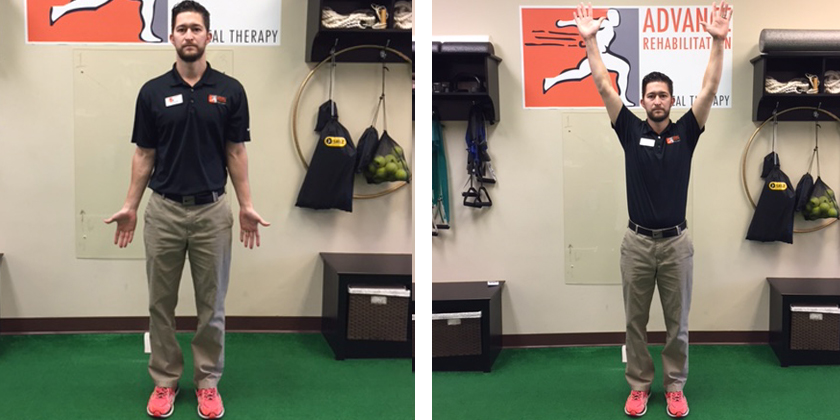
SHOULDER ABDUCTION
Begin with your arms at your side with your palms facing forward. Raise your arm straight out to the side until they are straight overhead.
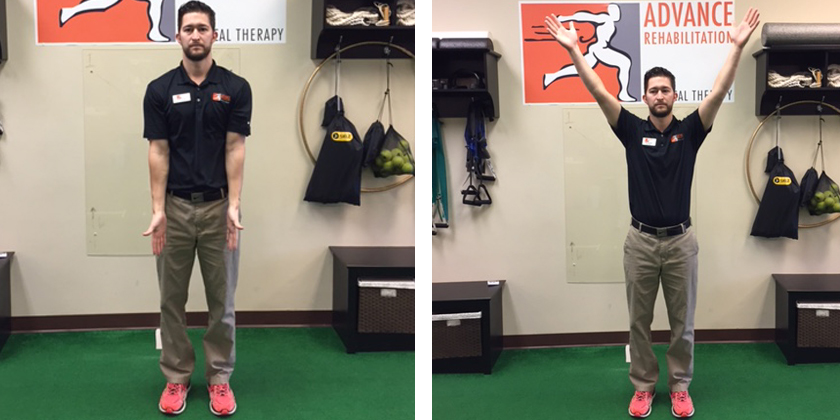
SHOULDER SCAPTION
Begin with your arms at your side. Raise your arms at a 45 degree angle creating a V shape with your arms until they are overhead.
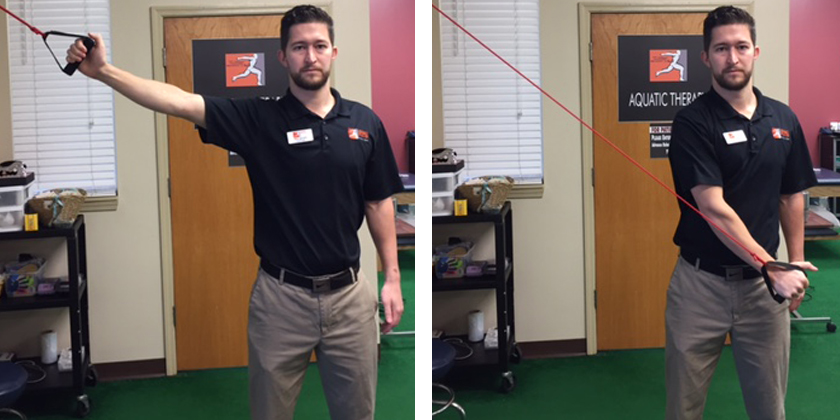
D2 EXTENSION
Secure band to wall or top of the doorway. Pull diagonally down across your body toward your opposite hip. Make sure to keep the elbow straight. Return to the starting position with a straight elbow and repeat.
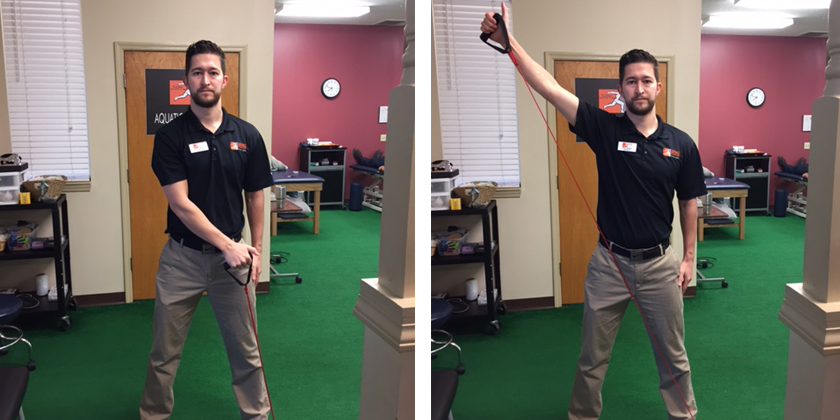
D2 FLEXION
Secure band to bottom of the doorway. Pull diagonally up across your body away from your body. Make sure to keep the elbow straight. Return to the starting position with a straight elbow and repeat.
This information was written by Advance Rehabilitation Physical Therapy, an outpatient physical therapy group with 24 locations in Georgia and Florida. Advance Rehabilitation is a physical therapy practice that focuses on providing the highest quality rehabilitation services. We specialize in physical therapy, sports medicine, industrial rehabilitation and athletic training. Our staff includes highly-trained professionals that serve as a bridge between injury and recovery to help patients get back to pre-injury status as quickly as possible. For more information click here.
See the entire Guidelines to Prevent Throwing Injuries series here:
In this monthly series, we examine the proper ways to exercise and prevent throwing injuries in baseball. If you have any sudden significant increase in pain, swelling, or discoloration while performing or following exercise, discontinue immediately and contact your primary care provider.
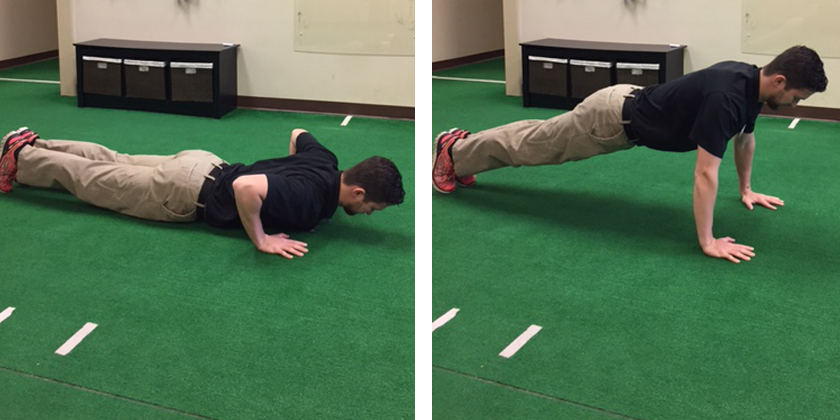
PUSH UPS
Start on your stomach with your hands below your shoulders. Maintain a straight line from your ankles, through your hips, to the shoulders. Extend your elbows pushing your stomach away from the floor.
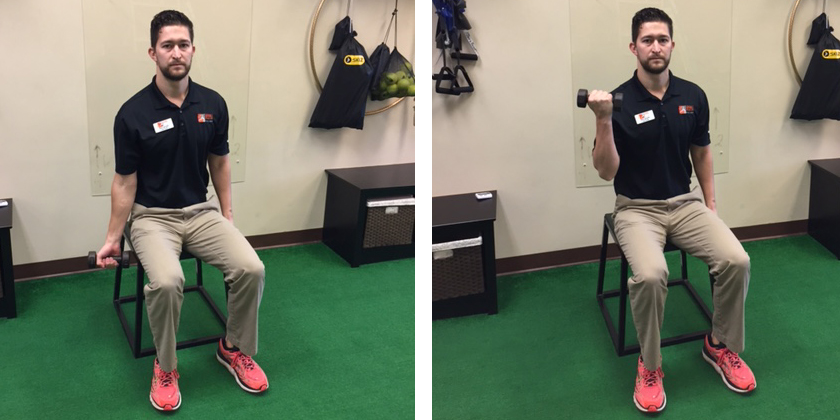
BICEP CURL
Begin seated with your elbow extended and palm facing forward. Bend the elbow as far up as you can without flexing your shoulder or rotating your wrist.
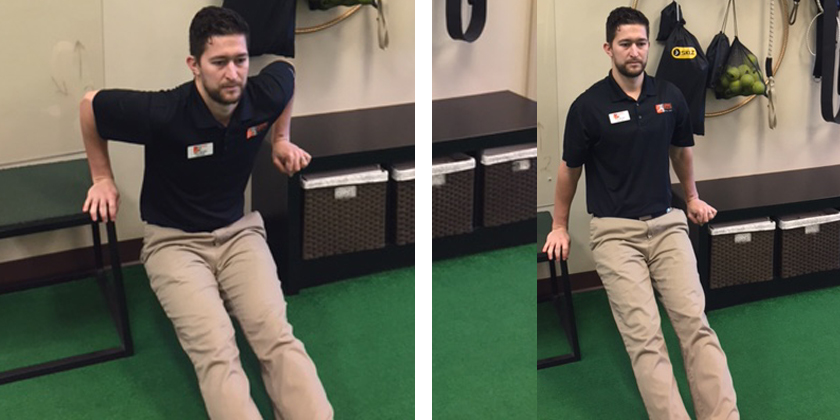
TRICEP DIP
Find two even surfaces to support your upper body with your elbows bent (a chair with arm rests works well). Extend your elbows pushing your body up toward the ceiling. Lower slowly.
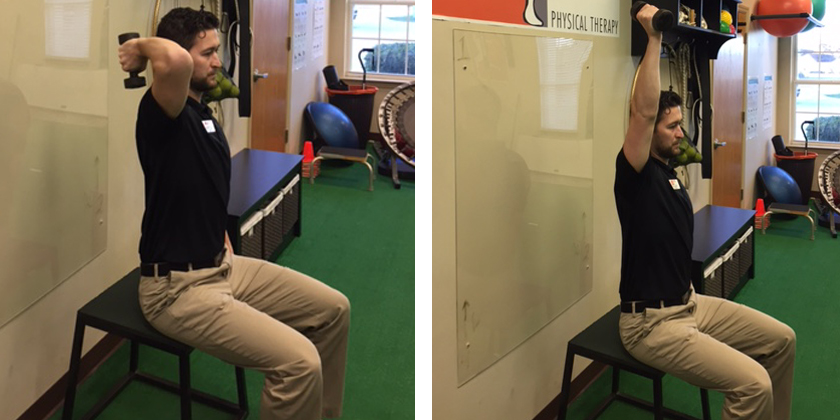
OVERHEAD TRICEP EXTENSION
With your shoulder in full flexion overhead, hold a weight in your hand with your elbow bent behind your head. Straighten your elbow toward the ceiling without changing the angle of your shoulder.
This information was written by Advance Rehabilitation Physical Therapy, an outpatient physical therapy group with 24 locations in Georgia and Florida. Advance Rehabilitation is a physical therapy practice that focuses on providing the highest quality rehabilitation services. We specialize in physical therapy, sports medicine, industrial rehabilitation and athletic training. Our staff includes highly-trained professionals that serve as a bridge between injury and recovery to help patients get back to pre-injury status as quickly as possible. For more information click here.
See the entire Guidelines to Prevent Throwing Injuries series here:
The most common causes of pitching arm injuries to high school, college and professional pitchers are overload, overuse, lack of proper conditioning and improper throwing mechanics.
• Overload is the result of throwing too many pitches during one outing. Maximum pitch counts for various age groups, or for an individual pitcher’s normal strength and stamina, are effective in preventing overload.
• Overuse is the result of pitching too often and not having an adequate recovery time or a good arm maintenance program (stretching, running, strengthening, throwing) between pitching assignments. Coaches and trainers should be aware that each individual pitcher varies in arm strength, arm fatigue, arm tightness and soreness and require different recovery time needs. Make certain you provide your pitcher with a good active recovery program between pitching assignments.
• Proper conditioning involves the entire body; the legs and core muscles as well as the throwing arm. Coaches should supervise a proper stretching and warm-up procedure that is performed daily before throwing a ball.
• Pre-season is one of the most frequent times for arm injuries. Pitchers throw too much and too hard, too early. Also, they have not ingrained their normal rhythm and often are attempting to learn new techniques or new pitches. Another major factor of injury during pre-season is that pitchers are not working with a normal in-season rotation schedule and do not get enough recovery time from a lot of necessary drill work that involves throwing (pick-offs, defensive plays, etc.).
• Improper throwing mechanics. If a pitcher has improper throwing techniques, with the body or arm, there is a great chance of early fatigue of the throwing mechanism, and of course injury. The more power and force generated, the greater the chance of injury. In a competitive situation, most pitchers will not admit they are fatigued, experiencing minor pain or have a minor injury. It is important that you, a coach, trainer or physical therapist be able to recognize changes in the pitcher’s mechanics, performance, or mannerisms.
This information about common causes of pitching arm injuries was written by University Physical Therapy, an outpatient physical therapy group with eight locations in New River Valley, Virginia. University PT is THE choice for outstanding sports rehabilitation, physical therapy and occupational therapy services. For more information click here.
Tennis Elbow, also known as lateral epicondylitis is an inflammation of the tendon fibers that attach the forearm extensor muscles to the outside of the elbow. More recently it is believed that this condition is due to the degeneration of the wrist extensor tendons. Either way, this affects the muscles that lift the wrist and hand. Pain may be felt where these fibers attach to the bone on the outside of the elbow or along the muscles in the forearm. Overuse of the muscles and tendons of the forearm and elbow are the most common reasons people develop the injury. Repeating some types of activities over and over again can put too much strain on the elbow tendons. These activities are not necessarily high-level sports competitions. Hammering nails, picking up heavy buckets, or pruning shrubs can all cause the pain. Some patients, however, develop tennis elbow without any specific recognizable activity leading to symptoms.
How to Treat Tennis Elbow
Splints: Your physician or therapist may fit you with a strap to provide support to the involved muscles. Remember not to fasten the strap too tight as this can cause more problems. You may also be given a wrist splint to wear to provide rest to the muscles and tendons that bend and straighten the wrist. If your elbow is extremely tender, you will be provided with a heelbo or cushion to prevent the elbow from being hit. Wear these devices as directed. You can’t get better unless you wear the splints properly.
Ice and/or Heat Applications: Discuss with your physical therapist how to correctly apply ice or heat to the parts of your elbow and forearm that are involved. Icing can help reduce swelling/inflammation in the muscles and tendons that cause epicondylitis. Your therapist may also recommend heat to increase circulation in the area and decrease symptoms, especially if your condition is more chronic. Do not apply either for longer than 10 to 15 minutes at a time.
Stretching and Strengthening: Your physical therapist will instruct on how to treat tennis elbow by showing proper stretching and strengthening techniques as prescribed by your physician. Stretching improves the range of motion, increases circulation, and decreases muscle fatigue and swelling. Stretching the extensor muscle mass also provides tissue elongation to relieve muscle contractions. Strengthening helps build and tone the small muscles affected in epicondylitis, while hopefully decreasing pain and preventing a return of symptoms. Your therapist and physician will instruct you on what exercises to perform, when to begin them, and how often to complete the exercises.
Exercise Example from The Jackson Clinics
Sports: You may want to stop playing any racquet sports for now to allow adequate healing and reduction of pain. Also avoid sports such as baseball, bowling, or golf until you are pain-free. Weightlifting and bike riding can also pose problems. For tennis players, your serve, racquet, and ball all play important parts in your recovery, so be sure to speak about this with your physical therapist before resuming play.
Rest: Now that you have sought medical attention, you only get one opportunity to rest the arm and decrease your symptoms. This doesn’t mean you should stop using your arm and put it in a sling. It does mean you need to stop doing the activities and movements that cause inflammation and pain Follow the advice of your physician and therapist and discontinue activities that provoke pain.
Look at what you do and how you do it, not only in your work setting but at home, too. Remember, while tendonitis occasionally occurs from a one-time incorrect movement, it usually occurs from the overuse of a small muscle group. In other words, the continual repetition of incorrect movements will eventually stress the body, setting the stage for pain and inflammation.