Tag Archives: summer sports

How much water do you need to stay hydrated

How Much Water Do You Need to Stay Hydrated

How much water do you need to stay hydrated

Fluid Intake is Essential for Good Health.

Water is needed to regulate temperature, maintain joint health, and deliver essential vitamins and minerals. Dehydration leads to impaired nerve and muscle function due to the body’s imbalance of sodium and potassium. Brain and muscle function become impaired causing decreased muscle coordination and impaired athletic performance.

Early signs and symptoms of dehydration include headaches, dry mouth, chills, dry skin, excessive thirst, and fatigue. The color of one’s urine is a good indicator of proper hydration. Improper hydration will cause your urine to become dark yellow. Signs of worsening dehydration are increased body temperature, heart rate, and body temperature. If you become confused, have vision disturbances, and have difficulty breathing, seek immediate medical attention.

Your risk of dehydration increases when you sweat excessively, increase your exercise intensity and duration when the temperature is high and at high altitudes.

How much water do you need to stay hydrated?

Staying hydrated on a normal day:

According to the National Academies of Sciences, Engineering and Medicine, the amount needed varies.

  • Men – 3.7 liters per day
  • Women – 2.7 liters per day

This covers water you receive from all sources – including the foods you eat. Most people can easily reach this amount in their daily eating and drinking habits.

Staying hydrated on a hot summer day:

When you’re active outside, the amount increases. The CDC recommends 1 cup every 15-20 minutes – about 1 quart an hour. Drinking in short intervals is more effective than drinking large
amounts infrequently.

Staying hydrated when you workout:

The American Council on Fitness suggests these guidelines for moderate to high-intensity exercise:

  • Drink 17-20 ounces of water 2-3 hours before working out
  • Drink 8 ounces of fluid 20-30 minutes before exercising or during the warm-up.
  •  Drink 7-10 ounces every 10-20 minutes during exercise.
  •  Drink an additional 8 ounces of fluid within 30 minutes after exercising.
  •  Drink 16-24 ounces for every pound of body weight lost after exercise.

Many sports teams will weigh the athletes before and after practice to determine the amount of fluid lost. The recommended weight loss limit due to fluid loss is 2% of your body weight per day. It is recommended that you drink 16-24 ounces of water for every pound lost.

WOW, THAT IS A LOT!

But it shows us how much fluid we can lose during higher levels of exercise and why it is so important to stay hydrated. It is essential to drink water before, during, and after practices and games. Especially in the warmer months.

water bottle

Are Sports Drinks Better Than Water?

Definitely in taste, but nothing hydrates the body better than water. Sports drinks do provide more potassium, minerals, and other electrolytes which will help you sustain your performance during exercise and may help you recover significantly faster in workouts over one hour in duration. The biggest problem with sports drinks is the sugar content. Many of them have multiple servings per bottle. Glucose is essential but you do not need as much as you will find in most sports drinks. I recommend a combination of water and a low-sugar sports drink. Research also indicates that chocolate milk may help the athlete recover more quickly when consumed after exercise due to its carbohydrate and protein content.

You should consult your pediatrician or family physician if you feel that you or your child has problems with dehydration.

physical therapy near me   Physical Therapy Appointment

Physical Therapy for Golfer's Elbow

Golfer’s Elbow

Physical Therapy for Golfer's Elbow (Medial Epicondylitis Pain)

Golfer’s Elbow

Golfer’s Elbow, medically known as medial epicondylitis,  is a painful condition where the tendons that attach to the inside of the elbow become inflamed due to repetitive use of the hand, wrist, forearm, and elbow. Golfer’s elbow often occurs with repetitive activities such as swinging a golf club or tennis racket, work or leisure activities requiring twisting and gripping such as shoveling, gardening, and swinging a hammer. Golfer’s elbow can also appear in other sports-related activities such as throwing and swimming. Golfer’s Elbow (Medial epicondylitis) is most commonly seen in men over the age of 35 but can be seen in any population. If these symptoms sound familiar, then going to physical therapy for golfer’s elbow may be just what you need.

Physical Therapy Appointment

What is causing your elbow pain?

Golfer’s Elbow (Medial epicondylitis) affects the group of muscles that are responsible for bending the wrist, fingers, and thumb and that rotate the wrist and forearm. The tendons that connect those muscles to the medial epicondyle (bump on inside of elbow). Tendons are made up of collagen fibers that are lined up next to each other. The repetitive forces pull on those tendons creating pain and tenderness described as Golfer’s Elbow. Without treatment, those tendons can eventually pull away from the bone. Acute injuries to your elbow can create an inflammatory response which can cause redness, warmth, and stiffness in your elbow.

Golfer’s Elbow (Medial epicondylitis) is most often caused by an abnormal arrangement of collagen fibers. This condition is called tendinosis. During tendinosis, the body doesn’t create inflammatory cells as it does during an acute injury. Instead, fibroblasts are created which help make up scar tissue to fill in the spaces between the collagen fibers. This increase in scar tissue can lead to increased pain and weakness in the tissues. Physical and hand therapy is the most common nonsurgical treatment for Golfer’s Elbow (medial epicondylitis). Your therapist will perform an evaluation where he/she will ask you several questions about your condition, pain level, and other symptoms you may be experiencing. He/she will perform motion and strength testing on your entire upper extremity. Your therapist will also palpate your arm to determine which tendon(s) may be inflamed. He/she will use special tests designed to deferentially diagnose your condition from others that may have similar presentations to Golfer’s Elbow, such as Cubital Tunnel Syndrome.

golf ball on tee

What to Expect from Physical Therapy for Golfer’s Elbow

  • Pain Management: this can include Mechanical Diagnosis & Therapy, ice, ice massage, moist heat, electrical stimulation, and ultrasound.
  • Range-of-Motion Exercises: stretches and mobility exercises to help maintain proper movement in your elbow, forearm, wrist, and hand.
  • Strengthening Exercises: progressive resistive exercises to help build strength in your arm, elbow, forearm, wrist, and hand. These can include weights, medicine balls, and/or resistance bands. This will also include your Home Exercise Program.
  • Manual Therapy: used to ensure full, pain-free movement is achieved and can include joint mobilizations, manual muscle stretches, and soft tissue massage.
  • Neuromuscular Re-education (Functional Training): used to help you return to your prior level of function for both home and work activities. This will include retraining proper movement patterns with necessary modifications based on the current level of function and patient limitations.
  • Patient Education: used to help retrain patients on proper postural control during everyday activities including dressing, self-care, work, and sports activities. This can include helping return a patient to their specific sport, such as making adjustments to their golf swing or throwing technique.

Once you’ve completed physical therapy for Golfer’s Elbow you’ll want to do everything you can to prevent this from reoccurring. This can occur by maintaining proper awareness of your risk for injury during your daily movements. Key things to keep in mind:

1. Maintain proper form during all repetitive movements both at work and at home.
2. Continue your Home Exercise Program in order to maintain proper strength in your shoulder, elbow, forearm, wrist, and hand.
3. Use proper posture and body mechanics with lifting or carrying to avoid any undue stress on your joints and tendons.

This information was written by Plymouth Physical Therapy Specialists, an outpatient physical and hand therapy group with fourteen locations in the surrounding Plymouth, Michigan area. At Plymouth Physical Therapy Specialists, they are committed to using evidence-based treatments in their practice. This means that their therapists utilize the most current and clinically relevant treatments in their approach to rehabilitation. For more information click here.

physical therapy near me

What Do Athletic Trainers Do?

What do Athletic Trainers Do?

With March being National Athletic Trainers Month, it is important to understand who they are and what athletic trainers do in our communities.

physical therapy near me

What Do Athletic Trainers Do?

Athletic trainers are highly skilled professionals who offer services in preventing, examing, diagnosing, and treating sports-related medical conditions and injuries. They work in different sports environments such as high school, college, and professional sports settings. Generally, they are the first responders when injuries occur during sporting events.

Athletic trainers hold at least a four-year degree from a BOC (Board of Certification) accredited institution and are licensed, certified health professionals working with athletes on and off the field. However, as of 2022, the National Athletic Trainers’ Association reports that 70% of athletic trainers in the U.S. have obtained a master’s degree.

Athletic trainers work closely with coaches and parents and often refer athletes to other healthcare professionals such as physicians, physical therapists, and surgeons when needed. They also monitor the physical condition of the athletes throughout the year to ensure that they are in good health regardless of if the athlete is in or out of season. Their hours of work are determined by the schedule of the sports. They are often available after school and stay until sporting events have concluded.

In the training room, athletic trainers will:

  • Prepare athletes for competition by taking preventative measures such as equipment fitting, taping, and bracing.
  • Assess athletes with acute and chronic injuries to determine their participation status.
  • Perform sport-specific rehabilitation on injured athletes.
  • Provide opportunities for strengthening and conditioning.
  • Work with sports staff on proper warm-up, game day preparation, and on/off-season conditioning.
  • Educate athletes, coaches, and parents on sports medicine strategies, nutrition, and sports psychology.

Athletic trainers support athletes during sporting events and manage and treat any musculoskeletal issues such as:

  • Shoulder, hip, knee, elbow, hand, and ankle injuries
  • Facial injuries
  • Neck and back injuries, spinal cord injuries, and traumatic brain injuries like concussions
  • Triage and wound care
  • Heat-related illnesses
  • Fractures and dislocations
  • Catastrophic injuries

Athletic Trainers Don’t Just Work With Athletes

The duties of many essential workers require a good range of motion, strength, and stamina while carrying the potential risk of developing musculoskeletal injuries. Athletic trainers also work in a variety of professional settings including but not limited to:

  • The Performing Arts
  • Military Bases
  • Police Departments
  • Fire Departments
  • Sports Medicine Clinics
  • Physician Offices, Hospitals, and Hospital Emergency Departments

Athletic trainers are crucial to the everyday life of athletes, essential workers, and more. They work to not only rehabilitate injuries but to prevent injuries as well through safety procedures and equipment. By deeming March National Athletic Trainers Month, we recognize their efforts and everything that they do for not only our athletes but our communities as well. If you have already experienced an injury or have long-lasting pain, our physical therapy teams can help you recover and get back to your sport.

Physical Therapy Appointment

This information was written by The Center for Physical Rehabilitation, an outpatient physical therapy group with five locations in Western Michigan. The Center specializes in all-inclusive physical therapy services, such as Sports Medicine, Orthopedic Post-Surgical, and McKenzie Therapy. Our state-of-the-art facilities are conveniently located around Grand Rapids with extended hours. Independent and locally owned since 1994, we have the freedom to work with the most qualified healthcare professionals.

golf stretches

Dynamic Golf Stretches

DynamicGolf_FBsize

Golf requires strength, flexibility, endurance, and power to create pain-free movement and improve your game. The most common golf injury is low back pain followed by shoulder pain and knee pain. A physical therapist can assist you in improving your pain and correcting your body’s deficits.  These golf stretches will make your golf game less painful and reduce those extra strokes:

hamstring stretch

Hamstring Stretch
(move from upright into stretched position 10x)

back extension stretch

Back Extension Stretch
(hold club backwards overhead, repeat 10x)

hip back shoulder rotation

Hip/Back/Shoulder Rotation Stretch
(hold club behind back and rotate torso to each side 10x)

calf stretch

Calf Stretch
(move from upright into stretched position 10x)

lumbar rotation 1

lumbar rotation 2

Lumbar Spine Rotation
(hold club, plant feet as shown, rotate to each side 10x)

forearm rotation 1

forearm rotation 2

forearm rotation 3

Forearm Rotation
(hold club straight up, then rotate to each side 10x)

Physical Therapy Appointment

This information was written by Mishock Physical Therapy and Associates, a privately-owned, outpatient physical therapy practice operating in southeast Pennsylvania. They actively participate in the community by providing services to schools, retirement communities, and local businesses. Their mission is to provide the most efficacious, state-of-the-art physical therapy services to relieve pain, restore function and return you to the highest quality of life possible. For more information click here.

sun safety

Sun Safety

sun safety

The official start to summer is here and for many of us, the end of the school year marks the start of outdoor activities and beach vacations. While enjoying yourself this summer be sure to take precautions. The sun’s ultraviolet (UV) rays can damage your skin in as little as 15 minutes. Follow these sun safety recommendations to help protect yourself and your family.

  • Shade
    You can reduce your risk of skin damage and skin cancer by seeking shade under an umbrella, tree, or other shelters before you need relief from the sun. Your best bet to protect your skin is to use sunscreen or wear protective clothing when you’re outside—even when you’re in the shade.
  • Clothing
    When possible, long-sleeved shirts and long pants and skirts can provide protection from UV rays. Clothes made from tightly woven fabric offer the best protection. A wet T-shirt offers much less UV protection than a dry one, and darker colors may offer more protection than lighter colors. Some clothing certified under international standards comes with information on its ultraviolet protection factor. If wearing this type of clothing isn’t practical, at least try to wear a T-shirt or a beach cover-up. Keep in mind that a typical T-shirt has an SPF rating lower than 15, so use other types of protection as well.
  • Hat
    For the most protection, wear a hat with a brim all the way around that shades your face, ears, and the back of your neck. A tightly woven fabric, such as canvas, works best to protect your skin from UV rays. Avoid straw hats with holes that let sunlight through. A darker hat may offer more UV protection. If you wear a baseball cap, you should also protect your ears and the back of your neck by wearing clothing that covers those areas, using sunscreen with at least SPF 30, or by staying in the shade.
  • Sunglasses
    Sunglasses protect your eyes from UV rays and reduce the risk of cataracts. They also protect the tender skin around your eyes from sun exposure. Sunglasses that block both UVA and UVB rays offer the best protection. Most sunglasses sold in the United States, regardless of cost, meet this standard. Wrap-around sunglasses work best because they block UV rays from sneaking in from the side.
  • Sunscreen
    Put on a broad-spectrum sunscreen with at least SPF 30 before you go outside, even on slightly cloudy or cool days. Don’t forget to put a thick layer on all parts of exposed skin. Get help for hard-to-reach places like your back. And remember, sunscreen works best when combined with other options to prevent UV damage.

How sunscreen works. Most sun protection products work by absorbing, reflecting, or scattering sunlight. They contain chemicals that interact with the skin to protect it from UV rays. All products do not have the same ingredients; if your skin reacts badly to one product, try another one or call a doctor.

SPF. Sunscreens are assigned a sun protection factor (SPF) number that rates their effectiveness in blocking UV rays. Higher numbers indicate more protection. You should use a broad spectrum sunscreen with at least SPF 30.

Reapplication. Sunscreen wears off. Put it on again if you stay out in the sun for more than two hours and after swimming, sweating, or toweling off.

Expiration date. Check the sunscreen’s expiration date. Sunscreen without an expiration date has a shelf life of no more than three years, but its shelf life is shorter if it has been exposed to high temperatures.

Cosmetics. Some makeup and lip balms contain some of the same chemicals used in sunscreens. If they do not have at least SPF 30, don’t use them by themselves.

Information supplied by the CDC

National Athletic Training Month

March is National Athletic Training Month

March is National Athletic Training Month

March is Athletic Training Month!

ATHLETIC TRAINERS (ATCs) are highly qualified, multi-skilled health care professionals who collaborate with physicians to provide preventative services, emergency care, clinical diagnosis, therapeutic intervention, and rehabilitation of injuries and medical conditions. They can work in a variety of settings, including high schools, middle schools, universities, professional sports teams, hospitals, clinics, performing arts, club sports teams, and more. Athletics trainers decrease the liability on coaches, ensure a quicker and safer return to play, and reduce the risk of injuries for athletes of all ages.

Athletic Trainers Provide Game & Practice Coverage:

• Early injury detection and intervention
• Quick referral process to local specialists if required
• Concussion safety injury screenings:
• Evaluation of injury
• Recommendation on immediate care
• Quicker return to play

March is National Athletic Training Month

WHAT IS NATIONAL ATHLETIC TRAINING MONTH?
March is National Athletic Training Month, a time to celebrate the positive impact athletic trainers have on work, life, and sport. National Athletic Training Month is sponsored by the National Athletic Trainers’ Association (NATA), the professional members association for certified athletic trainers, and others who support the athletic training profession. NATA represents more than 45,000 members worldwide.

ATC SPORTS STATS
All statistics are taken from www.atyourownrisk.org

90% of student-athletes report some sort of sports-related injury in their athletic careers.
54% of student-athletes report they have played while injured.
12% report they have sustained concussions and head injuries from their time on the field.
163,670 middle or high school athletes were reported being seen in the emergency room for a concussion.
300 sports-related deaths of youth anything to prevent injuries.
37% of public high schools employ a full-time athletic trainer.
54% of athletes said they have played while injured.

Looking for help with an injury? Don’t go back on the field too soon. Our licensed physical therapists can get your athlete back in the game safely. 

physical therapy near me

get active square

PT News

This Month in PT News. Featuring articles from PTandMe partnering clinics!

1. No Equipment Outdoor Workouts
Written by the Therapy Team at Momentum Physical Therapy – San Antonio, TX

We have an idea you might not hear often- take a break from the gym. How? Well, instead of being inside, take your work out ‘out’ and sweat outdoors without any equipment at all. Read more

2. Sensitive Pain
Written by the Ryan Beck, MPT at Oregon Spine and Physical Therapy – Eugene, OR

One of my favorite analogies!! I have used this on several patients and I’ll never forget a few years ago working with a particular patient when this analogy popped into my mind and I’ve used it so many times to help people who are having a lot of pain. Read more

3. Certified Hand Therapists: Helping People Live Their Lives
Written by Jan Taylor, OT Fellowship Director and OT Resource Coordinator at ARC Physical Therapy Plus – Overland Park, KS

The hand is so critical to every minute of our daily lives that when you lose function of it your world is turned upside down. Read more

throwing injuries PTandMe

Guidelines to Prevent Throwing Injuries

In this monthly series, we examine the proper ways to exercise and prevent throwing injuries in baseball. If you have any sudden significant increase in pain, swelling, or discoloration while performing or following exercise, discontinue immediately and contact your primary care provider.


WRIST EXTENSION
Start with the arm supported on a table and your wrist facing toward the ground. Hold the weight off the edge of the table and bring the back of your hand toward the ceiling.


WRIST FLEXION
Start with the arm supported on a table and your wrist facing toward the ceiling. Hold the weight off the edge of the table and bring your palm toward the ceiling.

ASMI GUIDELINES TO HELP PROTECT PITCHERS FROM SHOULDER & ELBOW THROWING INJURIES:

Don’t throw too much:
Daily, weekly and annual overuse is the greatest risk to a pitcher’s arm health. Numerous studies have shown that pitchers who throw more pitches per game and those who do not adequately rest between appearances are at an elevated risk of injury. While medical research does not identify optimal pitch counts, pitch count programs have been shown to reduce the risk of shoulder and elbow injury in Little League Baseball by as much as 50% (Little League, 2011). The most important thing is to set limits for a pitcher and stick with them throughout the season.

Don’t pitch through arm fatigue:
Individuals are 36 times more likely to develop shoulder and elbow injuries when routinely pitching with arm fatigue.

Don’t pitch more than 100 innings per year:
If an athlete throws over 100 innings they are 3.5 times more likely to be injured than those who did not exceed 100 innings pitched.

Don’t throw more than 8 months per year:
Athletes who throw > 8 months per year are 5 times as likely to suffer an injury requiring surgery of the elbow or shoulder. Pitchers should refrain from throwing for at least 2-3 months per year and avoid competitive pitching for at least 4 months per year.

Don’t pitch on consecutive days:
Pitchers who pitch on consecutive days have more than 2.5 times greater risk of experiencing arm pain.

Don’t play catcher following pitching:
If the player catches following pitching they are 2.7 times more likely to suffer a major arm injury.

Don’t play on multiple teams at the same time:
There is increased risk of injury due to the difficulty in monitoring pitch limits and rest time. If the player is on multiple teams, make meticulous efforts to keep track of the amount of pitches thrown to allow adequate rest.

Don’t forget the shoulder in strength and conditioning programs:
Numerous studies have shown that deficits in upper extremity strength and mobility are strongly correlated to serious arm injuries. Shoulder and forearm strengthening exercises can build strength, endurance and motor control which can prevent injury.

Be cautious with throwing curve balls and sliders:
While existing research has not consistently shown a strong connection between the curveball and injuries, Yang et al., found that amateur pitchers who threw curveballs were 1.6 times more likely to experience arm pain while pitching and Lyman et al, found that youth pitchers who throw sliders are 86% more likely to experience elbow pain.

Be cautious with the radar gun:
Radar guns do not directly cause harm to a pitcher, however, the gun may cause the pitcher to over throw beyond their normal comfort level. This could possibly create arm strain.

Following these guidelines may keep the throwing athlete safe from the debilitating shoulder and elbow throwing injuries seen on a regular basis in physical therapy clinics.

Pitching Guidelines Chart

This information was written by Advance Rehabilitation Physical Therapy, an outpatient physical therapy group with 24 locations in Georgia and Florida. Advance Rehabilitation is a physical therapy practice that focuses on providing the highest quality rehabilitation services. They specialize in physical therapy, sports medicine, industrial rehabilitation and athletic training. Their staff includes highly-trained professionals that serve as a bridge between injury and recovery to help patients get back to pre-injury status as quickly as possible. For more information click here.

See the entire Guidelines to Prevent Throwing Injuries series here:

   Prevent Throwing Injuries

   prevent throwing injuries

throwing injuries PTandMe

prevent throwing injuries

Guidelines to Prevent Throwing Injuries

throwing injuires

In this monthly series about how to prevent throwing injuries, we examine the proper ways to exercise and prevent throwing injuries in baseball. If you have any sudden significant increase in pain, swelling, or discoloration while performing or following exercise, discontinue immediately and contact your primary care provider.


PRONE ROW
Lay on your stomach with your arm hanging off the edge toward the ground. Squeeze your shoulder blade and bring your elbow toward the ceiling while keeping your forearm perpendicular to the ground.


PRONE ROW WITH EXTERNAL ROTATION
Lay on your stomach with your arm hanging off the edge toward the ground. Turn your wrist so your palm is toward your feet. Squeeze your shoulder blade and bring your elbow toward the ceiling while keeping your forearm perpendicular to the ground. Once your arm is parallel with the ground rotate the back of your hand toward the ceiling while keeping the elbow bent.


PRONE T (HORIZONTAL ABDUCTION)
Lay on your stomach with your arm hanging off the edge toward the ground. Lift your arm straight out to your side and squeeze your shoulder blade with the palm continuing to face toward the ground.


PRONE Y (SCAPTION)
Lay on your stomach with your arm hanging off the edge toward the ground. Lift your arm at a 45 degree angle over your head with your thumb facing toward the ceiling. Squeeze your shoulder blade down and toward your spine.

This information was written by Advance Rehabilitation Physical Therapy, an outpatient physical therapy group with 24 locations in Georgia and Florida. Advance Rehabilitation is a physical therapy practice that focuses on providing the highest quality rehabilitation services. They specialize in physical therapy, sports medicine, industrial rehabilitation and athletic training. Their staff includes highly-trained professionals that serve as a bridge between injury and recovery to help patients get back to pre-injury status as quickly as possible. For more information click here.

See the entire Guidelines to Prevent Throwing Injuries series here:

   Prevent Throwing Injuries

   prevent throwing injuries

throwing injuries PTandMe

crossfit

The Skinny on CrossFit

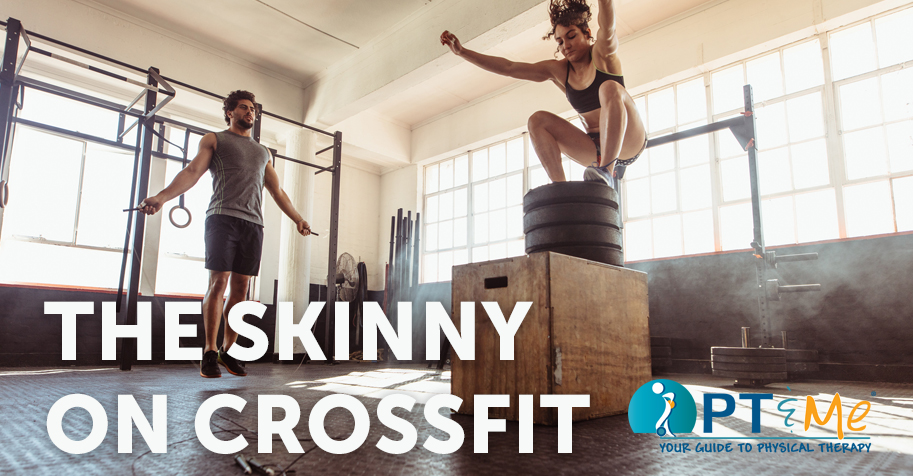
If you find going to a new gym nerve-wracking, joining a CrossFit gym might be downright terrifying. Walking into the warehouse-like gym and seeing people flipping tires while loud music pumps out of the stereo system and primal grunts and screams reverberate off the walls can be intimidating. Just take a deep breath, slip on your sneakers, grab your water bottle, and get ready to change your life completely.

Created by Gary Glassman, CrossFit is a high-intensity strength and conditioning program. It uses functional movements and varied workouts to help people lose weight, build muscle, and live healthier lives. While every CrossFit trainer is certified and able to adapt workouts to your needs, it is important that you consult your physician about any pre-existing conditions before beginning a new workout regime.

If you are nervous about going to your first CrossFit class, you can rest easy knowing it probably will not be very intense. Before you can participate in the daily workouts, you need to complete the Foundation Training. This is where you will learn the proper form and technique for the nine fundamental movements. Once you feel comfortable with these movements you can join the masses.

You first week at a Crossfit gym (typically called a “Box”) will be like your first week at a new school. There will be new friends to make, lots of questions to ask, and new skills to learn. You won’t be doing advanced moves in the beginning but you will still be working hard and will find yourself sore and tired by the end of the week.

Each class consists of a 15-minute warm-up, followed by 15 minutes of skill work. This is a great opportunity to improve on a move you are struggling with, or tackle an exercise you are nervous about in the Workout of the Day (WOD). After the skill work segment, you will move on to the WOD. The amount of time to complete a workout varies depending on the objective. Sometimes you will be racing against the clock, while other times you will be aiming for a timed personal best. A cool-down will round out your workout.

10 Components of CrossFit

Doing CrossFit is a full mind and body experience. There are 10 specific elements of physical fitness you will practice during each workout. Your overall fitness level will be determined based on your competency in all these domains.

  • Cardiovascular and Respiratory
  • Stamina
  • Strength
  • Flexibility
  • Power
  • Speed
  • Coordination
  • Agility
  • Balance
  •  Accuracy


Building Blocks of CrossFit
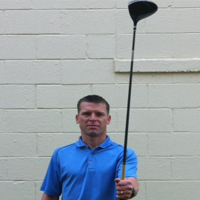
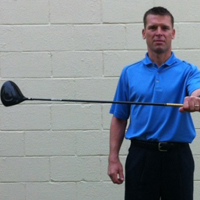
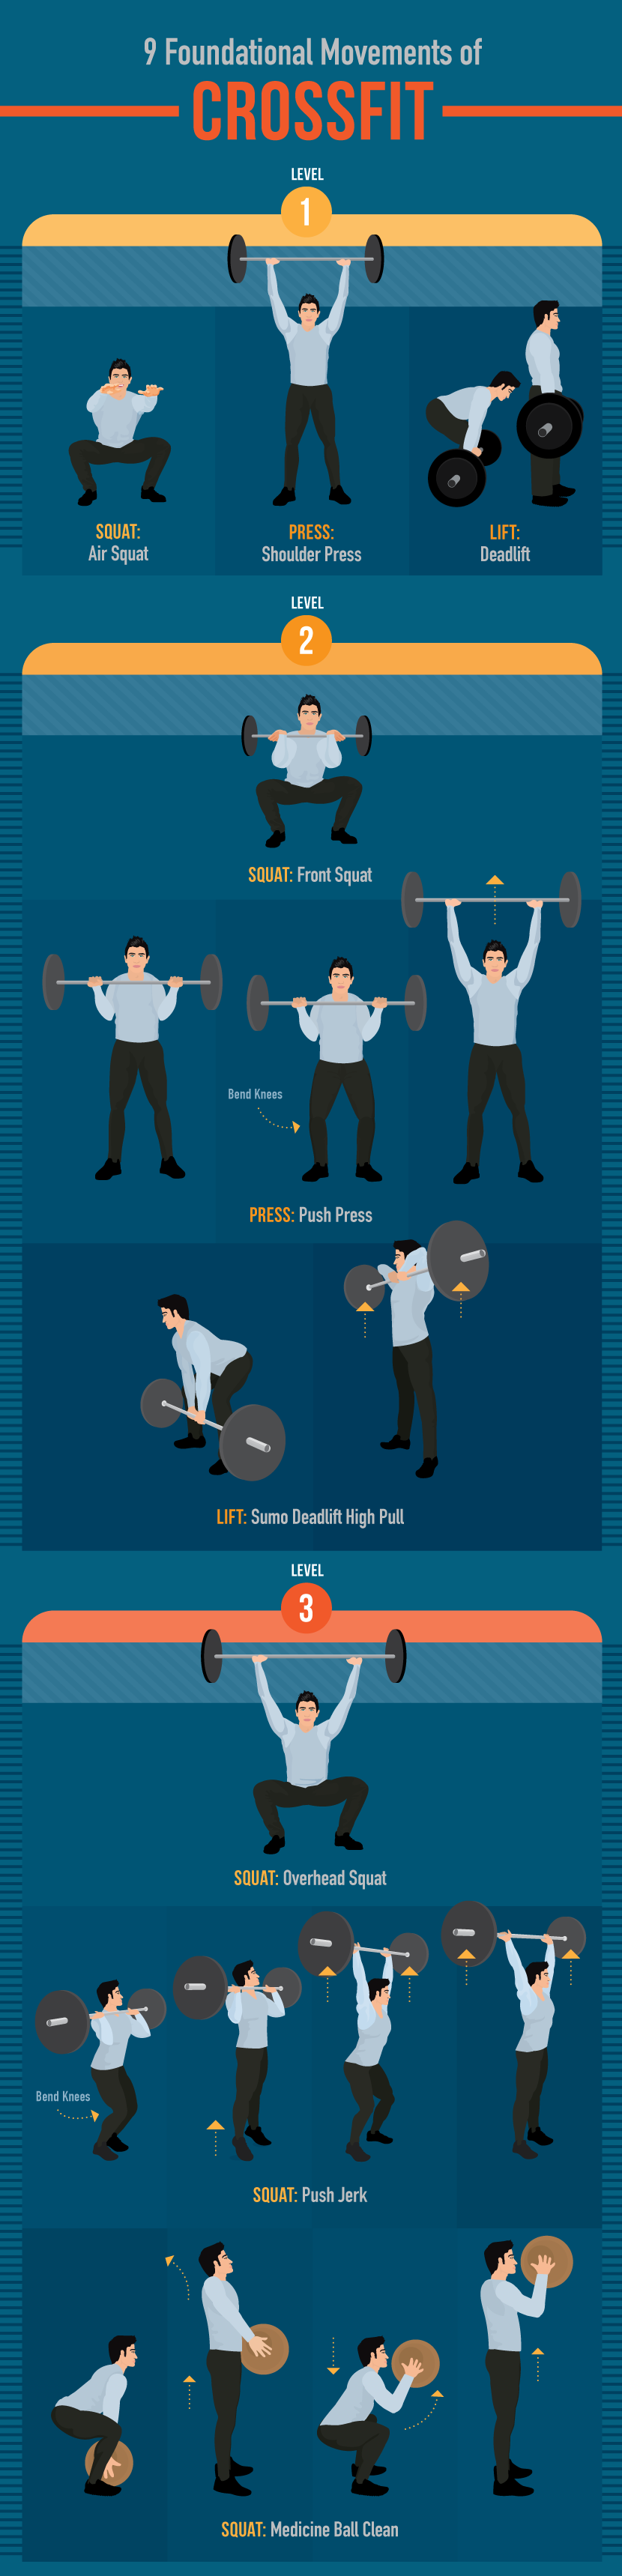
There are nine foundational movements every new CrossFit member must understand and master to ensure they get the most out of their workout and avoid injury. The three basic movements are: Squats, Presses, and Lifts. These movements increase in difficulty from Level 1 to Level 3. Once an athlete is comfortable with the form and technique associated with an exercise, they can progress to the next level.

Squats
The first movement you will learn when you join a CrossFit gym is an air squat. This basic movement is the foundation for the next two levels of squats. Squats are excellent lower-body exercises that engage your hamstrings, glutes, and quadriceps. As you progress through the three levels of squats, you will also begin to engage your upper body and core, making the squat a full-body workout.

Level 1 – Air Squat:

  • Stand with your knees shoulder-width apart and your toes angled out at approximately 10 degrees.
  • Keep your back, shoulders, and core tight.
  • Extend your arms out in front of you.
  • Press your hamstrings back and down.
  • As you lower yourself to the ground, press your knees out.
  • At the lowest point of the movement, your hips should be lower than the crease in your knees.
  • Press up through your hamstrings and glutes to return to the starting position.
  • Rest your hands at your side.

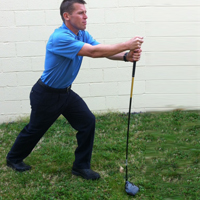
Level 2 – Front Squat:

  • Begin in the same stance as for an air squat.
  • Hold a bar in front rack position. (Rack position: Rest the bar on your shoulders across your chest. Your elbows should be up and your triceps parallel to the floor. Loosely grip the bar at slightly wider than shoulder width, with palms facing the ceiling.)
  • Once you are comfortable holding the bar, complete the same downward movement executed in an air squat.

Level 3 – Overhead Squat:

  • Begin in the same stance as for an air squat.
  • Hold a bar over your head with your palms facing forward.
  • Elbows should be locked and your wrist and forearms aligned (no bend or flexion).
  • Complete the same downward movement executed in an air squat.
  • Keep your chest up and eyes forward during this movement. If you feel like you are leaning too far forward you might be compromising the exercise. Reduce your weight and continue.
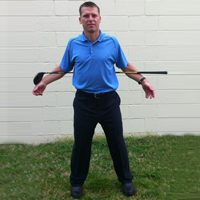
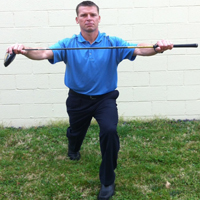
Presses
Presses are fantastic for targeting and toning your upper body. They will engage your arms, shoulders, back, and, depending on what level you are on, your legs. As with squats, there are three levels of press.

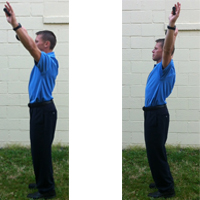
Level 1 – Shoulder Press:

  • Stand with your feet hip-width apart and eyes looking forward.
  • Rest the bar across the front of your shoulders, gripping it slightly wider than shoulder width.
  • Use a hook grip to secure your hands around the bar. (Hook Grip: Cross your middle finger and index finger over your thumb.)
  • Press the bar upwards.
  • As the bar moves straight up, only your head should move back to allow the bar to travel in front of your face.
  • At the top of the movement your arms should be fully extended above your head with elbows locked.
  • Follow the same line to lower the bar back to the starting position.

Level 2 – Push Press:

  • Hold the bar in the same position as for a shoulder press.
  • Keep your torso upright and your core engaged, and slightly lower your body by bending your knees.
  • Explosively straighten your knees and use the momentum in the movement to press the bar above your head.
  • Arms should be fully extended with locked elbows at the top of the movement.
  • Lower the bar back to starting position.

Level 3 – Push Jerk:

  • Hold the bar in the same position as for a shoulder press.
  • Lower your body into a quarter-squat position.
  • Perform a vertical jump.
  • When you are in the air, press the bar above your head.
  • Land with your feet in the exact same spot they took off from and with a slight bend in your knees.
  • Finish the movement by fully extending your hips and knees.
  • Return the bar to your shoulders.
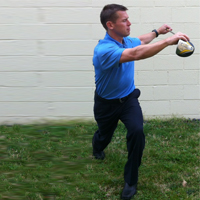
Lifts
The three progressive lifts in CrossFit engage your entire body. These full body movements allow you to make the most out of any workout. If you are short on time, incorporate these exercises into your routine to torch calories and burn muscle.
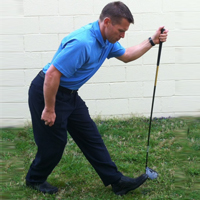
Level 1 – Deadlift:

  • Place the bar in front of you and stand with your feet hip-width apart.
  • Bend forward at the hips, bending your knees slightly, and grip the bar at a point that is wider than hip-width.
  • The bar should be in contact with your shins and your shoulders should be slightly ahead of it.
  • Keep a flat back as you lower your glutes and pull up on the bar (arms should not bend).
  • Straighten your back and legs while lifting the bar in a vertical line up your body.
  • When the bar passes your knees, fully extend your hips forward.

Level 2 – Sumo Deadlift High Pull:

  • Use a wide stance for this movement.
  • With your hands narrowly apart (about two fist-widths), grip the barbell in front of you with your palms facing down.
  • Keep your arms straight and chest up while you slightly bend your knees into a quarter-squat.
  • Explosively stand up and shrug your shoulders, pulling the bar up in a vertical line.
  • By the time your hips are fully extended, your elbows should be above the bar pointing up and your hands should be aligned with your shoulders.
  • Slowly lower the bar back to the ground by reversing this movement to complete the repetition.

Level 3 – Medicine Ball Clean:

  • Swap out the barbell for a medicine ball.
  • Squat down over the ball.
  • Keep your chest up and gaze ahead.
  • Keep your arms straight and grab the ball on opposite sides.
  • Explode up, shrug your shoulders, and slip your body under the ball so that it lands in front of your face.
  • Catch the ball at the bottom of a front squat with your hips below your knee joints.
  • Complete the movement by standing up with your arms remaining bent, and the ball in front of your face.

WOD are you Talking About?
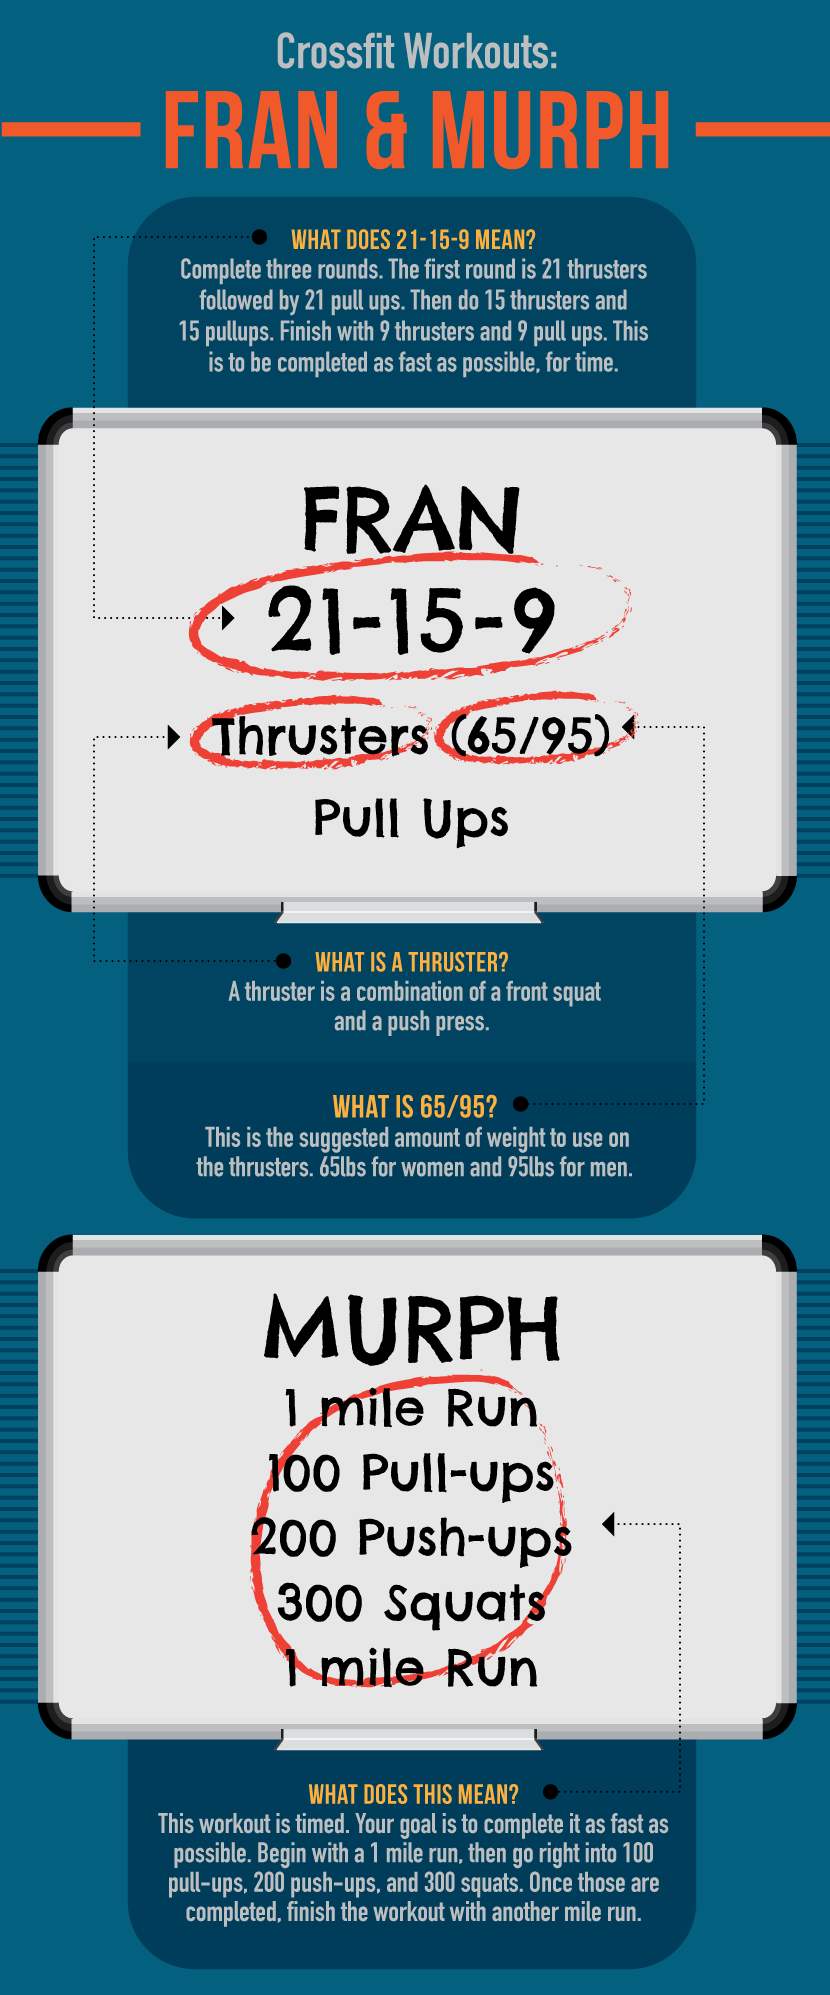
It’s no secret that CrossFit has a lingo of its own. If you’ve ever heard someone talking about CrossFit, you might wonder what language they are speaking and why they hate their friends Josh and Nancy so much. While they might be talking about a person, it is more likely your CrossFit friends are discussing a tough workout they just did. Each WOD is given a name. WODs are usually named after women (in the same way storms are, because they are so intense they leave you feeling like you were hit by a hurricane) or after fallen war heroes. Here are two notorious WODs that people love to trash.

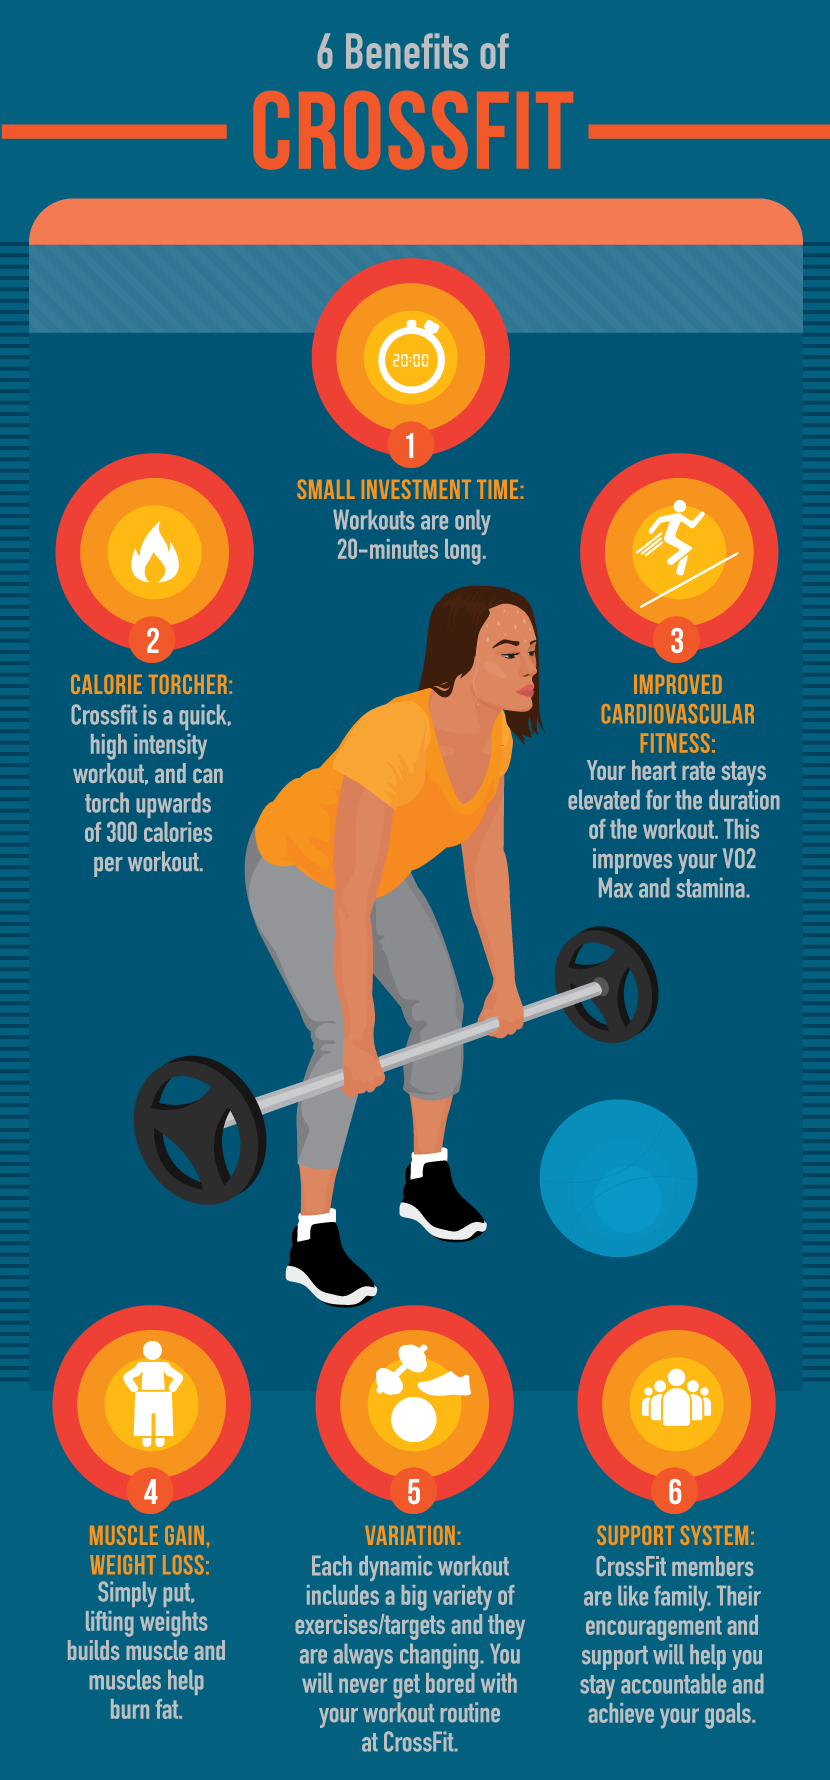
Six Benefits of CrossFit
CrossFit is a tough workout, you can’t deny that. But, if you are willing to take a shot and get your sweat on, you will reap the rewards. Here are just a few of the many benefits CrossFit will have on your health and life.

The best thing to do if you are considering joining a CrossFit gym is to stop by and check one out. They have certified coaches on site who will be more than willing to answer your questions and put your fears to rest. Who knows, you could be the next breakout star at the CrossFit games!