Tag Archives: summer sports

PT News

This Month in PT News. Featuring articles from PTandMe partnering clinics!

1. Decreasing Cartilage Loss in Osteoarthritis
Written by the Therapy Team at The Jackson Clinics Physical Therapy – Northern Virginia

Although some over-the-counter nutritional supplements have been advertised as capable of rebuilding cartilage in arthritic joints, the claims most often do not stand up under scientific scrutiny. Read more

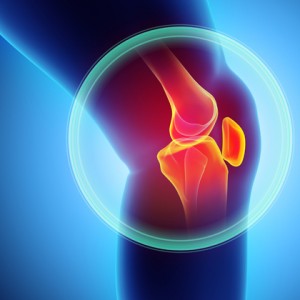
2. Treating Degenerative Meniscus Tears
Written by the Therapy Team at The Jackson Clinics Physical Therapy – Northern Virginia

During the aging process, the fibrous cartilage between the thighbone (femur) and the shinbone (tibia) within the knee can degenerate and become prone to tearing. Read more

3. Five Stretching Tips Before You Workout
Written by the Therapy Team at Momentum Physical Therapy – San Antonio, TX

As temperatures start to warm up, many of you will start to hit the streets, trails, and parks to exercise outdoors. Read more

Guidelines to Prevent Throwing Injuries

GuidelinesPreventThrowingInjuries#3_FBsize

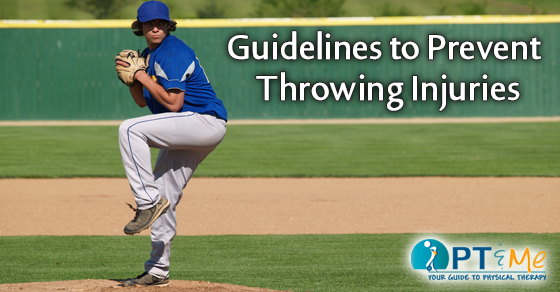
In this third intallment of our series to prevent throwing injuries, we examine the proper ways to exercise and prevent throwing injuries in baseball. If you have any sudden significant increase in pain, swelling, or discoloration while performing or following exercise, discontinue immediately and contact your primary care provider.


INTERNAL ROTATION WITH SHOULDER AT 90 DEGREES OF ABDUCTION
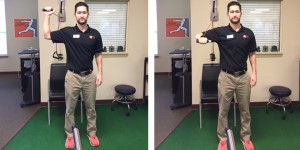
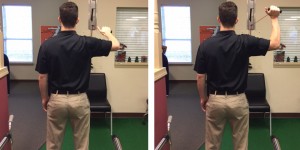
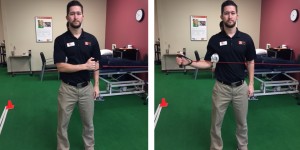
Attach band high up on a doorway and face away from door. Hold band and move your arm out sideways away from your body until your arm is parallel with the ground. Bend your elbow to 90 degrees and point your fist toward the ceiling. Rotate from your shoulder bringing your hand forward while keeping your arm parallel to the floor and your elbow bent to 90 degrees.


EXTERNAL ROTATION WITH SHOULDER AT 90 DEGREES OF ABDUCTION
Attach band high on a doorway and face toward the door. Hold band and move your arm out sideways away from your body until your arm is parallel with the ground. Bend your elbow to 90 degrees and point your fist toward the door. Rotate from your shoulder bringing your hand away from the door while keeping your arm parallel to the floor and your elbow bent to 90 degrees.


SHOULDER INTERNAL ROTATION AT SIDE
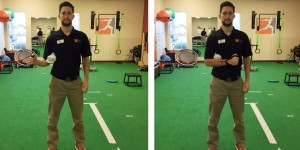
Attach band to the doorway at chest height. Stand perpendicular to the doorway with the arm you are exercising closest to the door. Keep your arm at your side with a towel roll under the arm and bend the elbow to 90 degrees. Bring your hand toward your stomach while keeping the elbow bent to 90 degrees.


SHOULDER EXTERNAL ROTATION AT SIDE
Attach band to the doorway at chest height. Stand perpendicular to the doorway with the arm you are exercising furthest from the door. Keep your arm at your side with a towel roll under the arm and bend the elbow to 90 degrees. Bring your hand away from your stomach while keeping the elbow bent to 90 degrees.

This information was written by Advance Rehabilitation Physical Therapy, an outpatient physical therapy group with 24 locations in Georgia and Florida. Advance Rehabilitation is a physical therapy practice that focuses on providing the highest quality rehabilitation services. We specialize in physical therapy, sports medicine, industrial rehabilitation and athletic training. Our staff includes highly-trained professionals that serve as a bridge between injury and recovery to help patients get back to pre-injury status as quickly as possible. For more information click here.

See the entire Guidelines to Prevent Throwing Injuries series here:

   Prevent Throwing Injuries

   prevent throwing injuries

throwing injuries PTandMe

soccer injury

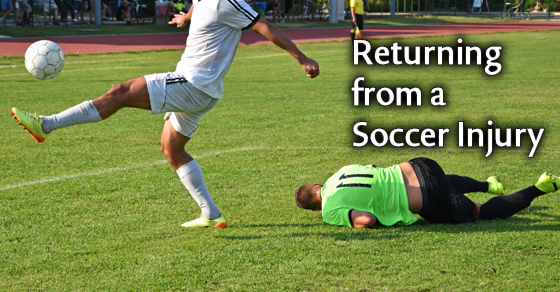
Returning from a Soccer Injury

Returning from Soccer Inury_FBsize

Soccer is the most played sport in the world and is the number one sport in many countries. It is a great cardiovascular workout that combines aerobic and anaerobic movements. However, due to the sudden changes in pace and the speed at which the game is played there is a high chance of a soccer injury.

Sports injury expert Dr. David Geier reveals that that the six most common soccer injuries are ankle sprains, joint fractures, anterior cruciate ligament (ACL) tear, meniscus tear, adductor strain, and hamstring strains. These injuries are due to the amount of stress a soccer player will put on their leg joints. The good news is that through physical therapy these injuries can be recovered from.

Ankle Sprains
The ankle sprain is the most common and least serious soccer injury. The most common recovery method is to put ice on the ankle to stop the swelling, strap it, and lightly exercise it through physical therapy. One effective motion exercise is to sit on a chair with the foot flat on the floor and gently move the knee from side-to-side to stop it becoming stiff. A player should be out for a maximum of six weeks.

ACL
An ACL soccer injury can leave a player out of the game for much longer. For example, an ACL tear may require surgery (making a new ligament) in order to return to the pitch. While surgery may be required, physical therapy is definitely needed to help rebuild knee strength. The exercises will include mobility and strength exercises such as knee flexion and extension, heel slides, and isometric quadriceps exercises. As the knee joint gets stronger, plyometric drills will be introduced to the therapy to see whether the knee is strong enough to play competitive sport. These exercises may include resistance band jumps, hopping exercises and box jumps.

soccer_injury

Hamstring Strains
After knee and ankle injuries the next most common injury are hamstring strains. These are often caused through a combination of sudden explosive moments and overuse. We have all seen a soccer, football, or basketball player burst forward only to suddenly stop and crumple to the ground. That is nearly always a hamstring injury. Depending on which grade of hamstring injury the player has will change the therapy needed. If it is a grade one injury then as the muscle slowly heals the player will use ice alongside resting. Function training will also be required to regain strength and flexibility. A grade two or three injury may require surgery.

Career Threatening Injuries
A career threatening injury is the biggest risk of playing soccer. However, there is hope for injured and senior soccer players. Walking Soccer, which was developed in 2011 in England, according to British newspaper The Telegraph, allows those with mobility injuries to keep playing. As the name suggests running is outlawed, which in turns takes much of the risk and pressure off of the leg joints that can be easily injured.

The new game has been endorsed by English soccer legends such as Alan Shearer, who according to journalist Dan Fitch who works for news site Betfair Soccer who preview the Champions League fixtures in Europe, is the third fastest player to score 50 goals in the English Premier League. Shearer himself is retired and told The Telegraph that after retiring he couldn’t play the sport he made his name in due to persistent injuries. Walking Soccer has allowed Shearer and other ex-pros to play without the worry of injuries or heavy contact from other players. For amateurs and professionals alike walking soccer is a godsend.

Soccer injuries can be serious and more often that not require physical therapy to recover from. Even if you have suffered a serious injury there is still hope through new sports such as Walking Soccer.

whiplash

PT News

This Month in PT News. Featuring articles from PTandMe partnering clinics!

thinking healthy

2. What You Eat Affects Inflammation and Healing
Written by Meghan Russo, PTA at the Center for Physical Rehabilitation – Grand Rapids, MI

Did you know that many foods can decrease or increase inflammation and help to decrease pain? Read more

running couple

3. Tips for Beginner Runners
Written by the Therapy Team at Momentum Physical Therapy – San Antonio, TX

If you think running is not for you – think again. Read more

Prevent Throwing Injuries

Guidelines to Prevent Throwing Injuries

In our second installment of “Guidelines to Prevent Throwing Injuries” we examine the proper ways to exercise and prevent throwing injuries in baseball. If you have any sudden significant increase in pain, swelling, or discoloration while performing or following exercise, discontinue immediately and contact your primary care provider.


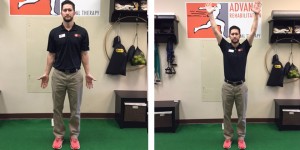
SHOULDER ABDUCTION
Begin with your arms at your side with your palms facing forward. Raise your arm straight out to the side until they are straight overhead.


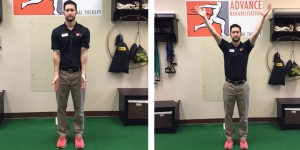
SHOULDER SCAPTION
Begin with your arms at your side. Raise your arms at a 45 degree angle creating a V shape with your arms until they are overhead.


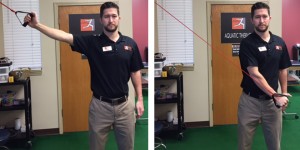
D2 EXTENSION
Secure band to wall or top of the doorway. Pull diagonally down across your body toward your opposite hip. Make sure to keep the elbow straight. Return to the starting position with a straight elbow and repeat.


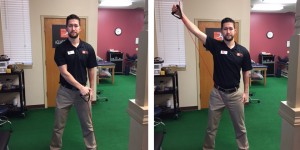
D2 FLEXION
Secure band to bottom of the doorway. Pull diagonally up across your body away from your body. Make sure to keep the elbow straight. Return to the starting position with a straight elbow and repeat.

This information was written by Advance Rehabilitation Physical Therapy, an outpatient physical therapy group with 24 locations in Georgia and Florida. Advance Rehabilitation is a physical therapy practice that focuses on providing the highest quality rehabilitation services. We specialize in physical therapy, sports medicine, industrial rehabilitation and athletic training. Our staff includes highly-trained professionals that serve as a bridge between injury and recovery to help patients get back to pre-injury status as quickly as possible. For more information click here.

See the entire Guidelines to Prevent Throwing Injuries series here:

   Prevent Throwing Injuries

   prevent throwing injuries

throwing injuries PTandMe


overtraining

Are You Overtraining?

Are You Overtraining_FBsize

Maintaining a rigorous workout schedule without allowing enough time for the body to recover, often leads to what is known as overtraining. Not only is an athlete at a higher risk for injury but overtraining can manifest itself in several other ways.

WHAT CAN CAUSE OVERTRAINING
• Sudden increase in exercise frequency
• Intensity or duration of training sessions
• Not allowing your body adequate recovery
• The length of time you have been training

SIGNS AND SYMPTOMS OF OVERTRAINING
• Persistent muscle soreness
• Elevated resting heart rate.
• Increased susceptibility to infections.
• Increased incidence of injuries.
• Irritability
• Depression
• Loss of motivation
• Insomnia
• Stop noticing progress towards training goals
• Becoming restless and losing focus
• Feeling sluggish all day

HOW TO AVOID OVERTRAINING
• Get enough sleep – this is the time when your body is able to heal the most
• Proper nutrition- get plenty of protein, fats and carbs
• Monitor stress levels

leg press

Exercise Smartly:
• Find a balance and avoid workouts that are too intense for you
• Progress workouts slowly

Allow Proper Recovery Time Between Workout Sessions:
Take one or two days between workout sessions or alternate intensity levels for each workout

Stay Active On Off Days:
• Try a less intense mode of exercise (Active Rest)
• Yoga, stretching, or foam rolling can be done on these days

Information provided by the Center for Physical Rehabilitation – Grand Rapids, MI
To learn more about the Center for Physical Rehabilitation click here.

bike fit

Does Your Bike Fit?

DoesYourBikeFit_FBsize

There is a misconception that only competitive cyclists benefit from bike fittings. The truth is that anyone that rides a bike on a consistent basis should ride a bike that fits them properly. Granted, competitive cyclists are looking for every advantage with respect to power and performance. However, fitness and recreational riders can gain the same benefits while also improving comfort and reducing the risk of on-the-bike injuries. Often, a few basic changes to a bike can make a significant difference with respect to comfort, power, endurance and overall performance. In this blog we briefly examine some of the key areas that must be considered to ensure a proper bike fit.

THINGS TO LOOK FOR

Frame Size
Obviously, not all frames are created equal. Frame geometry can vary dramatically depending on material, the manufacturer and overall design. Head tube angles, seat tube angles, top tube length, wheel base, etc. are all factors which contribute to how a bike handles and rides. This is where test riding a bike will pay dividends. For example, having a steep head angle may sound like a good idea to achieve a responsive ride. However, you may find it a bit unnerving on a steep, fast descent or even when you try to take your hands off the bar to eat or drink. With regard to mountain bikes, different suspension and wheel size options also affect the way a bike handles and rides. All are personal preferences that should match your intended use.

For general fit, most manufacturers will have measurements that you can take on yourself to help you decide which frame size will likely be best for you. However, you may also fall within the acceptable range for two different frame sizes. In that case, there is no substitute for going to a shop that carries the bikes and riding them both. In all likelihood, you will quickly feel the difference and easily decide which will work best for you. If you are leaning toward the larger of the two sizes, make sure to check the stand over height before laying your cash on the counter. Keep in mind that your primary concern with respect to frame size is the fit from the waist down. Reach is obviously important as well. However, most upper body adjustment can be achieved by varying bars or stem length/angle assuming the length of the top tube is appropriate.

Crank Arm Length
This is one area where people seem to be content to accept a length simply because that particular crank arm is what they have been told is standard or best. The truth is that many bikes come equipped with crank arms that are too long for the prospective rider. Even when told they should have a shorter crank arm, some feel that if they can push it, they will be a stronger, more powerful rider. This can be a foolish mindset as this can result in knee and/or back problems. Of course, there are also occasions where the crank arms may not be long enough. In this instance, the rider is likely giving away potential power and performance. When deciding on an appropriate crank arm length, we are usually talking about millimeters of difference. However, there are specifications for crank arm length typically based on inseam length and/or seat height.

Cleat Alignment
Pedal choice as well as cleat adjustment are vital components of bike fit. Proper cleat alignment is the starting point for overall fit and essentially aligns the position of the foot in relation to the spindle of the pedal and the crank arm. It can also be one of the most difficult aspects of fit to get accurately established. This is true primarily because it is hard to align your cleat when it is mounted to your shoe which is on your foot and clipped into the pedal. Furthermore, most modern pedal/cleat combinations allow for considerable adjustment with respect to float, rotation, fore and aft, and side-to-side. Equally important is the shoe. People often buy soft cycling shoes that are comfortable on and off the bike. Although these shoes may be more comfortable for walking, you are giving up considerable force production and performance on the bike. Furthermore, on long bike rides, these softer shoes can result in “hot spots” and foot fatigue. Cycling shoes don’t need to be uncomfortable. However, when you are riding a bike, wear the shoe that is made for the job.

Seat Adjustment
This is another area that results in much debate. Do you go higher for better force generation or lower for better control on descents? Once again, improper seat height can result in pain or injury. It can also significantly limit your performance. For most riders, seat height and saddle setback (fore/aft positioning) is crucial for comfort and performance. This is the area where the biggest abuse of the law of averages has befallen bike fit. Seat adjustment is often based on averages and equations. Unfortunately, this is rarely the correct position. Much better than averages are measured angles with the rider on the bike which results in a more exacting fit.

Stem Length/Bar Height
Fitting stem length and bar height should be based on alignment, posture, comfort and performance. These factors can have a great effect on your back, neck, shoulders and wrists.

You may be saying to yourself, “Then tell me how my bike should be set up.” The fact is that an accurate fit cannot be done without looking at the individual on their bike. Many bike fits are based on measurements such as inseam, reach, trunk length, etc. which are then plugged into a variety of equations. Adjustments to the bike are then made according to the resulting numbers. The problem is that these equations often vary and are based on averages. Most of us aren’t average. We all have differing body composition and physique. Strength, flexibility, experience and orthopedic issues all play into proper bike fit. Proper fit must be done with the rider on the bike looking at specific measures and alignments.

Ultimately, a good bike fit is well worth the money and can go a long way toward improving comfort on the bike, improving your performance, and reducing the risk of injury. There are obviously many approaches and “schools of thought” when it comes to bike fit. The point here is that the most accurate fits are accomplished by evaluating you on your bike. Remember, depending on your effort and ability, cycling can be a very intense form of exercise. However, that doesn’t mean you have to hurt. If you have pain on the bike, something is typically wrong. More often than not, the problem can be addressed by improving fit. The bottom line is that you want to be sure the bike you ride is fit specifically to you. You should never be forced to fit yourself to the bike.

Written by Michael Choate, MSPT, USA Cycling Certified Coach at North Lake Physical Therapy & Rehabilitation in Portland, Oregon.

North Lake Physical Therapy & Rehabilitation clinics use progressive techniques and technologies to stay on the forefront in their field. OTheir staff is committed to providing patients with advanced healing techniques. To learn more about them click here.


Athletic Training Month

March is National Athletic Training Month

MarchNationalAthleticTrainingMonth_FBsize

March is National Athletic Training Month! Your protection is our top priority. Athletic trainers are health care for life and sport.

Athletic trainers specialize in patient education, injury prevention, and are an athlete’s first line of defense from the time of injury to recovery. Athletic trainers work closely with coaches and parents and may refer athletes to other health care professionals such as physicians, physical therapists and surgeons when needed.

What is an Athletic Trainer?
Athletic trainers hold at least a four year degree from a BOC (Board of Certification) accredited institution. they are licensed, certified health care professionals working with athletes on and off the field. Generally they are the first responders when injuries occur during sporting events.

Athletic trainers work closely with coaches and parents and will refer athletes to other health care professionals such as physicians, physical therapists and surgeons when needed.

Athletic trainers hours are determined by sports schedules. Typically they are available after school and stay until sporting events have concluded.

For more information about our athletic trainers, and what they do visit NATA’s websites at: www.nata.org or www.atyourownrisk.org

Throwing Injuries

Guidelines to Prevent Throwing Injuries

In this monthly series, we examine the proper ways to exercise and prevent throwing injuries in baseball. If you have any sudden significant increase in pain, swelling, or discoloration while performing or following exercise, discontinue immediately and contact your primary care provider.


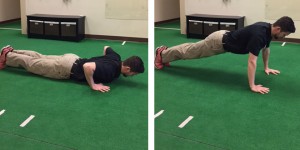
PUSH UPS
Start on your stomach with your hands below your shoulders. Maintain a straight line from your ankles, through your hips, to the shoulders. Extend your elbows pushing your stomach away from the floor.


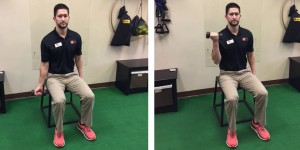
BICEP CURL
Begin seated with your elbow extended and palm facing forward. Bend the elbow as far up as you can without flexing your shoulder or rotating your wrist.


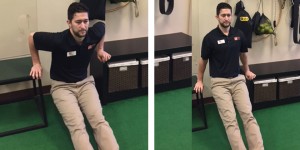
TRICEP DIP
Find two even surfaces to support your upper body with your elbows bent (a chair with arm rests works well). Extend your elbows pushing your body up toward the ceiling. Lower slowly.


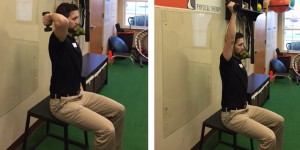
OVERHEAD TRICEP EXTENSION
With your shoulder in full flexion overhead, hold a weight in your hand with your elbow bent behind your head. Straighten your elbow toward the ceiling without changing the angle of your shoulder.

This information was written by Advance Rehabilitation Physical Therapy, an outpatient physical therapy group with 24 locations in Georgia and Florida. Advance Rehabilitation is a physical therapy practice that focuses on providing the highest quality rehabilitation services. We specialize in physical therapy, sports medicine, industrial rehabilitation and athletic training. Our staff includes highly-trained professionals that serve as a bridge between injury and recovery to help patients get back to pre-injury status as quickly as possible. For more information click here.

See the entire Guidelines to Prevent Throwing Injuries series here:

   Prevent Throwing Injuries

   prevent throwing injuries

throwing injuries PTandMe

avoid pitching injuries

Physical Therapist Tips on Avoiding Injury to Your Throwing Arm & What to Do in Case You Do

PTTipsOnThrowing_FBsize

Throwing a baseball or softball is one of the most demanding motions on the human body in sports. For each throw, the athlete generates high levels of energy in the arm and body to accelerate the baseball and softball to a high velocity. Just as it is important to understand proper biomechanics to improve performance, it is important to understand the stresses placed on the throwing shoulder and elbow by the throwing process.

Physical Therapist Tips on how to avoid pitching injuries

• Teach young athletes to be mindful of how their bodies feel. Pain is the first sign of a problem, and athletes of all ages need to pay close attention to any type of muscle twinge, tightening, or burning sensation.

• Coaches should carefully observe their pitchers’ techniques. Success on the field may be fleeting if the pitches ultimately are damaging a young player’s shoulder.

• Conditioning and strengthening exercises are most effective after mechanics are learned and put into action. If possible, begin a conditioning program at least a month before the season begins. A basic stretching regimen should be used before a player ever picks up a baseball.

• Players should start with short tosses and gradually work up to throwing the ball a greater distance. Increasing the velocity should be the final step.

• If the arm region is sore or tight, apply ice to the area for 10-15 minutes to help diminish the amount of blood that might otherwise leak into the muscle. When there is microscopic tearing of the muscle tissue, blood is leaking into the surrounding muscular tissue, causing pain and muscle spasms. Using ice will help reduce the pain, spasms, and inflammation associated with this condition.

• Before age 10, only fast ball and change-up should be permitted.

This information about how to avoid pitching injuries was written by University Physical Therapy, an outpatient physical therapy group with eight locations in New River Valley, Virginia. University PT is THE choice for outstanding sports rehabilitation, physical therapy and occupational therapy services. For more information click here.