Tag Archives: Overuse Injury

Avoid common baseball injuries

10 Ways To Avoid Common Baseball Injuries

Avoid common baseball injuries

According to an article published by the Journal of Athletic Training, youth baseball players reported throwing-arm pain 74% of the time. They also reported that UCL reconstructions between 2003 and 2014 increased by 343%, with 56.6% in those aged 15 to 19 years. With the increase in injuries related to the pitching athlete, we wanted to take a minute and focus on what you can do to help prevent common baseball injuries from happening to your athlete.

Physical Therapy Appointment

WHAT ARE COMMON BASEBALL INJURIES?

  • The most common baseball injuries include mild soft tissue injuries, such as muscle pulls (strains), ligament injuries (sprains), cuts, and contusions (bruises).
  • Although baseball is a non-contact sport, most serious injuries are due to contact — either with a ball, bat, or another player.
  • The repetitive nature of the sport can also cause overuse injuries to the shoulder and elbow.

WHAT CAN YOU DO TO PREPARE FOR THE SEASON?

  • Physical exam. A pre-season physical exam is important for both younger and older players. The goal is to prevent injuries and illnesses by identifying any potential medical problems. These may include asthma, allergies, heart, or orthopedic conditions.
    Warm up and stretch. Always take time to warm up and stretch.
  • Warm up with some easy calisthenics, such as jumping jacks. Continue with walking or light running, such as running the bases.
  • Gentle stretching, in particular your back, hamstrings, and shoulders, can be helpful. Your team coach or athletic trainer may provide a stretching program.

10 WAYS TO AVOID COMMON BASEBALL INJURIES

ASMI GUIDELINES TO HELP PROTECT PITCHERS FROM SHOULDER AND ELBOW INJURIES:

Pitching

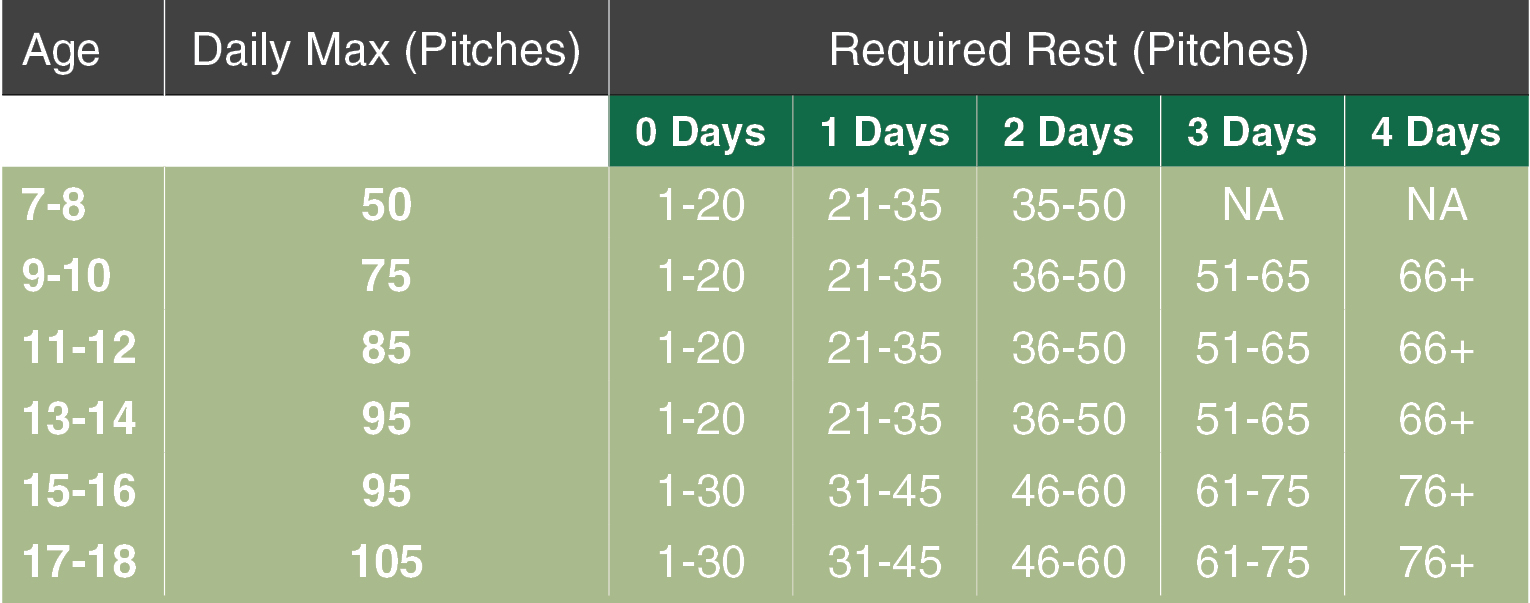
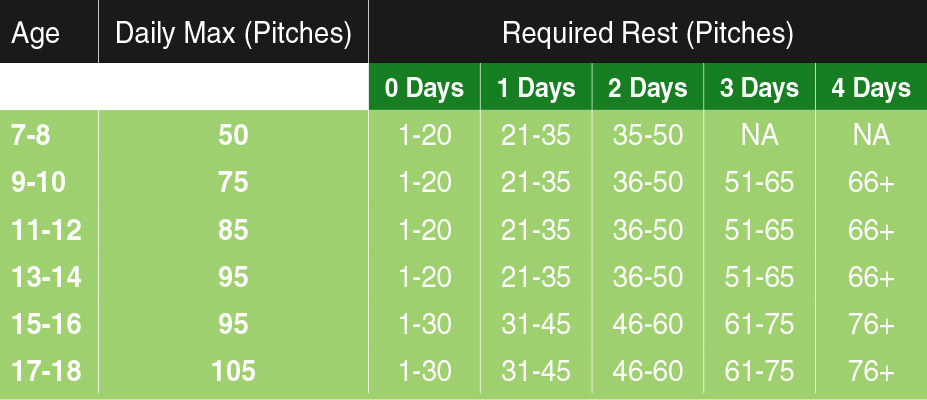
1. Don’t throw too much:
Daily, weekly and annual overuse is the greatest risk to a pitcher’s arm health. Numerous studies have shown that pitchers who throw more pitches per game and those who do not adequately rest between appearances are at an elevated risk of injury. While medical research does not identify optimal pitch counts, pitch count programs have been shown to reduce the risk of shoulder and elbow injury in Little League Baseball by as much as 50% (Little League, 2011). The most important thing is to set limits for a pitcher and stick with them throughout the season.

2. Don’t pitch through arm fatigue:
Individuals are 36 times more likely to develop shoulder and elbow injuries when routinely pitching with arm fatigue.

3. Don’t pitch more than 100 innings per year:
If an athlete throws over 100 innings they are 3.5 times more likely to be injured than those who did not exceed 100 innings pitched.

4. Don’t throw more than 8 months per year:
Athletes who throw > 8 months per year are 5 times as likely to suffer an injury requiring surgery of the elbow or shoulder. Pitchers should refrain from throwing for at least 2-3 months per year and avoid competitive pitching for at least 4 months per year.

5. Don’t pitch on consecutive days:
Pitchers who pitch on consecutive days have more than 2.5 times greater risk of experiencing arm pain.

6. Don’t play catcher following pitching:
If the player catches the following pitching they are 2.7 times more likely to suffer a major arm injury.

7. Don’t play on multiple teams at the same time:
There is an increased risk of injury due to the difficulty in monitoring pitch limits and rest time. If the player is on multiple teams, make meticulous efforts to keep track of the number of pitches thrown to allow adequate rest.

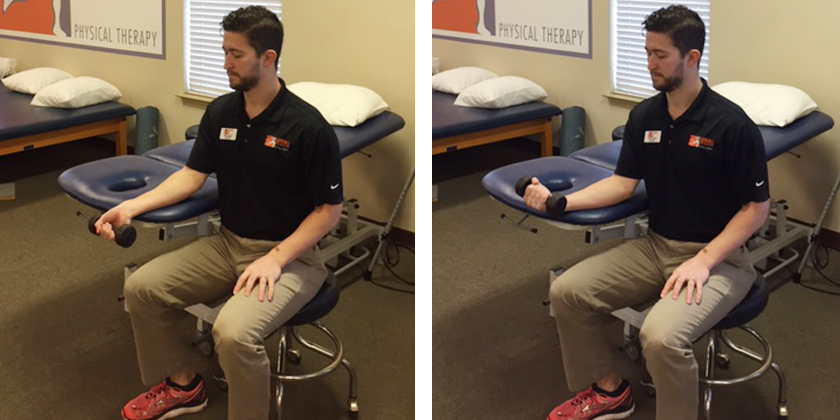
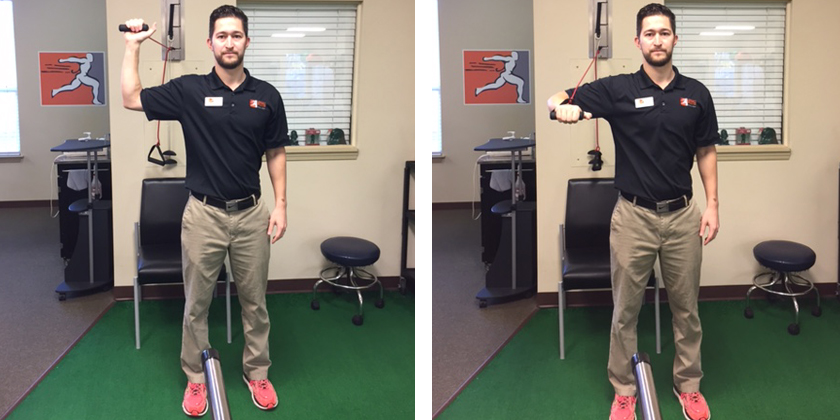
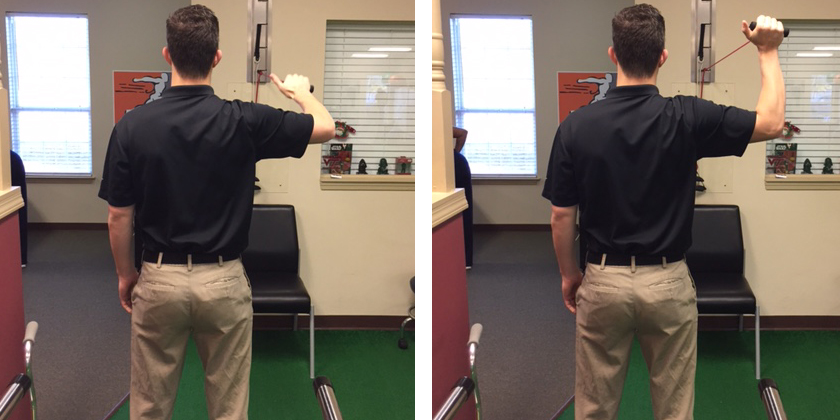
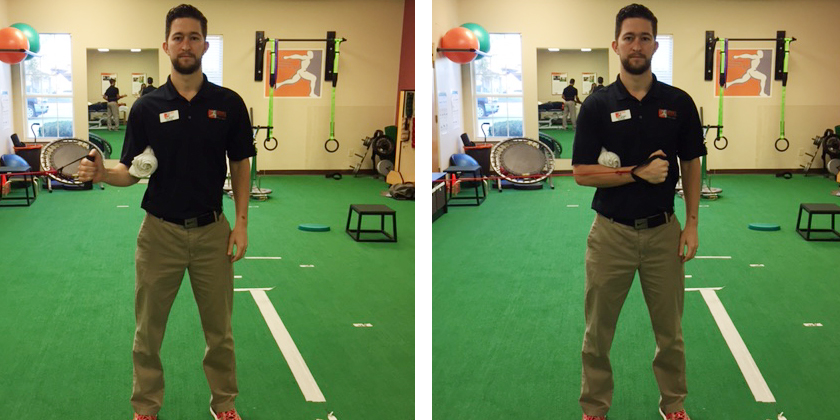
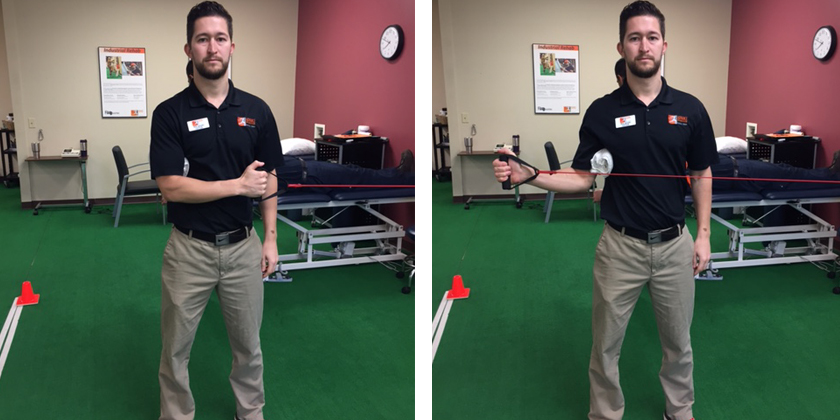
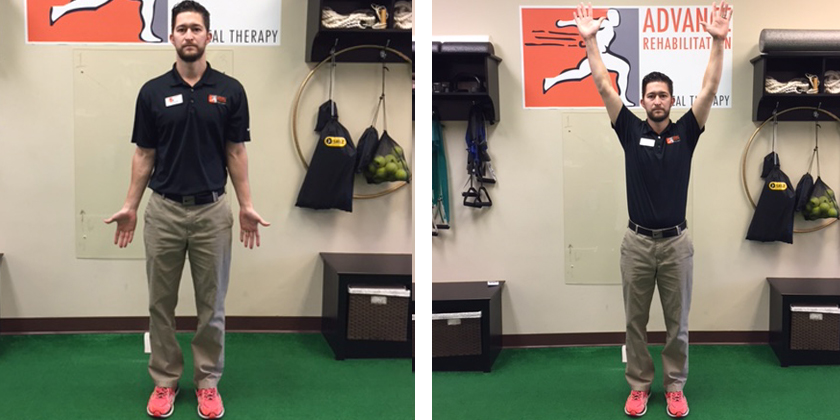
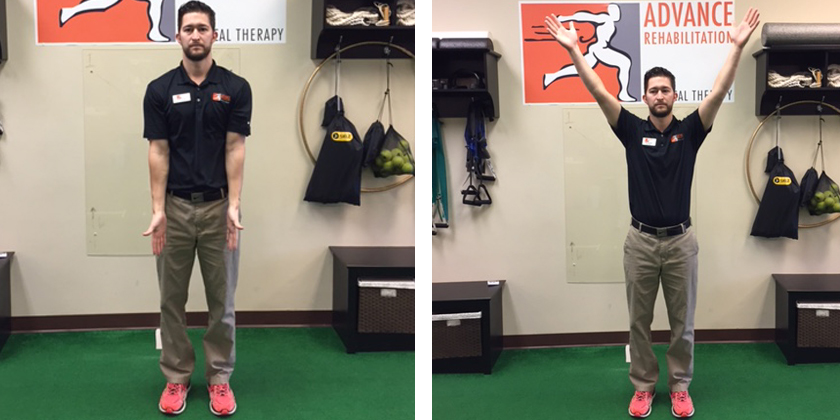
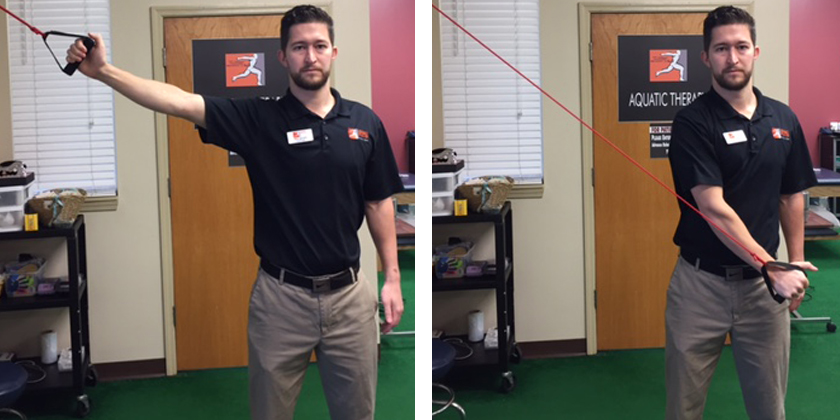
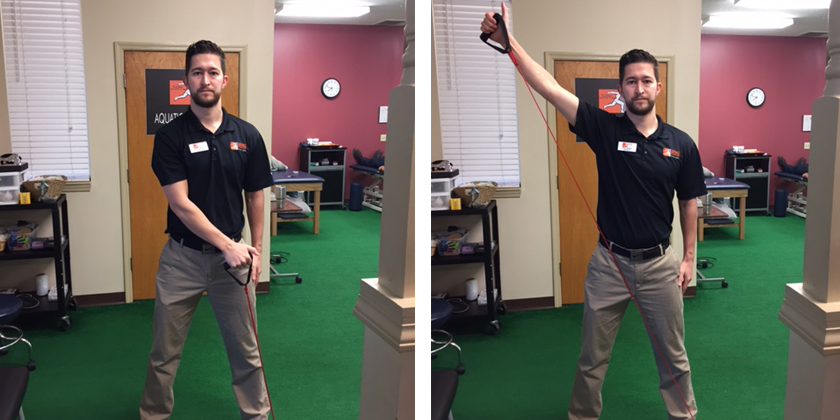
8. Don’t forget the shoulder in strength and conditioning programs:
Numerous studies have shown that deficits in upper extremity strength and mobility are strongly correlated to serious arm injuries. Shoulder and forearm strengthening exercises can build strength, endurance and motor control which can prevent injury.

9. Be cautious with throwing curveballs and sliders:
While existing research has not consistently shown a strong connection between the curveball and injuries, Yang et al., found that amateur pitchers who threw curveballs were 1.6 times more likely to experience arm pain while pitching and Lyman et al, found that youth pitchers who throw sliders are 86% more likely to experience elbow pain.

10. Be cautious with the radar gun:
Radar guns do not directly cause harm to a pitcher, however, the gun may cause the pitcher to throw beyond their normal comfort level. This could create an arm strain.

Don’t redshirt this season. Physical therapists can work with athletes to make sure certain muscle groups can accommodate the strain and movements necessary to perform well in your sport. Be proactive and work towards a great season with PT!

physical therapy near me


Safe Lifting Practices for Back Injury Prevention

Lifting Safety: Safe lifting practices for back injury prevention.

Whether at home or at work safe lifting practices can keep your back healthy and safe. Before lifting heavy objects decide how you will lift carry & place the item before you pick it up. Test the weight of the load by moving or tipping it. Figure out if you can break the load down by placing the contents of large containers into a number of smaller ones before moving them. Is the path clear? What is the weight of the load? How much stress will be placed upon your back? Is there traffic, a tripping hazard, a doorway to go through, or a stairway to go up or down? Avoid carrying an object that requires two hands to hold, either up or especially down a flight of stairs. Use the elevator. Plan a rest stop, if needed. Knowing what you’re doing and where you’re going will prevent you from making awkward movements while holding something heavy. Clear a path, and if lifting something with another person, make sure both of you agree on the plan.

KEY STEPS FOR SAFE LIFTING PRACTICES

Establish a Base of Support: Use a wide, balanced stance with one foot in front of the other. Make sure that you have firm footing and that your feet are a shoulders-width apart. This staggered stance gives you the stability of not falling over and being able to secure the load.

Keep Your Eyes Up: Looking slightly upward will help you maintain a better position of the spine. Keeping your eyes focused upwards helps you keep your back straight.

Get a Good Grip: With your palms and make sure you have an adequate hold on the object. Be certain you will be able to maintain a hold on the object without having to adjust your grip later. You can use gloves to help maintain an adequate grip, but don’t rely on gloves because they can desensitize the fingers and make you unable to feel the object.

Lift Gradually with Your Legs: Without using jerky motions. By using your leg strength, your chance of lower back injury is greatly reduced.

Tighten you stomach muscles: As you begin the lift and keep you head and shoulders up.

Pivot – Don’t Twist: Move your feet in the direction of the lift. This will eliminate the need to twist at the waist.

Weight: A lighter load normally means a lesser risk of injury. The weight of the object should be within the capacity of the person to handle safely.

Handling: It is easier to pull or push a load than it is to lift, put down or carry.

Keep the Load Close: Holding a 20lb object with your hands 20 inches from the body creates more compressive force on your low back than holding it 10 inches away. This is because the muscles in your back have to work to counterbalance the weight when it is further from the body. As the compressive force on your low back increases, so does the risk of muscle strains, ligament sprains and damage to the disks in the spine.

Frequency: The more times a load is handled, the more tired the muscles become, making it easier for the person to be injured.

Distance: The farther the load has to be moved, the greater the risk of injury.

Duration (TIME): Where the job involves repetitive movements, reducing the time spent on handling will help to ensure the movements are not causing unnecessary strain.

Forces Applied: Forces should be applied smoothly, evenly and close to the body. Forces exerted should be well within the capacity of the person, and the person should maintain proper posture.

Nature of the Load: Loads that are compact, stable, easy to grip, and capable of being held close to the body are much easier to handle.

Terrain: Rough ground, steep slopes, slippery and uneven floors, stairs and cluttered floors make moving a load awkward and increase the chance for injury.

Environment (Climate & Lighting): If it is too hot, too humid, too cold or the lighting is inadequate, the capacity to work safely is reduced.

Condition of the Workplace: Safe and comfortable working conditions, with adequate space to perform the task, and tools and equipment that are well-maintained, make their job safer.

Age/Gender: Young and old workers alike may be at an increased risk of injury from manual materials handling activities. Ensure abilities of employees are in line with functional job requirements.

Training: Proper training for the specific task is vital to reduce injury.

Team Lifting: If one person cannot lift or move a heavy, large or awkward object safely, organize a team lift. Team lifting reduces the risk of injury, reduces fatigue and makes the task much easier.

Raise/Lower Shelves: The best zone for lifting is between your shoulders and your waist. *Put heavier objects on shelves at waist level, lighter objects on lower or higher shelves.

Avoid Lifting from the Floor: Lifting from the floor can greatly increase your risk of injury for two reasons. Firstly, it is difficult to bring objects close to your body when picking them up from the floor, especially large objects where your knees can get in the way. Secondly, your low back must now support the weights of your upper body as you lean forward, in addition to supporting the weight of the item you are lifting. Lifting the same 20lbs from the floor more than doubles the amount of force on your low back when compared with lifting is from waist height. Even a one pound object lifted from the floor increases you risk of injury if you use a bent over posture.

Get Help When You Need It: Don’t try to lift heavy or awkward loads on your own. Even though the muscles in your upper body may be strong enough to handle the load, the muscles, ligaments and disks in your lower back may be injured because of the additional forces they have to withstand. Get help from a co-worker, and whenever possible, use a cart, hand truck or other mechanical device to move the load for you.

This content was written by Fit2WRK who has partnered with PT and Me to give a comprehensive look into the services physical and occupational therapists provide. For more information on Fit2WRK click here.

throwing injuries PTandMe

Guidelines to Prevent Throwing Injuries

In this monthly series, we examine the proper ways to exercise and prevent throwing injuries in baseball. If you have any sudden significant increase in pain, swelling, or discoloration while performing or following exercise, discontinue immediately and contact your primary care provider.


WRIST EXTENSION
Start with the arm supported on a table and your wrist facing toward the ground. Hold the weight off the edge of the table and bring the back of your hand toward the ceiling.


WRIST FLEXION
Start with the arm supported on a table and your wrist facing toward the ceiling. Hold the weight off the edge of the table and bring your palm toward the ceiling.

ASMI GUIDELINES TO HELP PROTECT PITCHERS FROM SHOULDER & ELBOW THROWING INJURIES:

Don’t throw too much:
Daily, weekly and annual overuse is the greatest risk to a pitcher’s arm health. Numerous studies have shown that pitchers who throw more pitches per game and those who do not adequately rest between appearances are at an elevated risk of injury. While medical research does not identify optimal pitch counts, pitch count programs have been shown to reduce the risk of shoulder and elbow injury in Little League Baseball by as much as 50% (Little League, 2011). The most important thing is to set limits for a pitcher and stick with them throughout the season.

Don’t pitch through arm fatigue:
Individuals are 36 times more likely to develop shoulder and elbow injuries when routinely pitching with arm fatigue.

Don’t pitch more than 100 innings per year:
If an athlete throws over 100 innings they are 3.5 times more likely to be injured than those who did not exceed 100 innings pitched.

Don’t throw more than 8 months per year:
Athletes who throw > 8 months per year are 5 times as likely to suffer an injury requiring surgery of the elbow or shoulder. Pitchers should refrain from throwing for at least 2-3 months per year and avoid competitive pitching for at least 4 months per year.

Don’t pitch on consecutive days:
Pitchers who pitch on consecutive days have more than 2.5 times greater risk of experiencing arm pain.

Don’t play catcher following pitching:
If the player catches following pitching they are 2.7 times more likely to suffer a major arm injury.

Don’t play on multiple teams at the same time:
There is increased risk of injury due to the difficulty in monitoring pitch limits and rest time. If the player is on multiple teams, make meticulous efforts to keep track of the amount of pitches thrown to allow adequate rest.

Don’t forget the shoulder in strength and conditioning programs:
Numerous studies have shown that deficits in upper extremity strength and mobility are strongly correlated to serious arm injuries. Shoulder and forearm strengthening exercises can build strength, endurance and motor control which can prevent injury.

Be cautious with throwing curve balls and sliders:
While existing research has not consistently shown a strong connection between the curveball and injuries, Yang et al., found that amateur pitchers who threw curveballs were 1.6 times more likely to experience arm pain while pitching and Lyman et al, found that youth pitchers who throw sliders are 86% more likely to experience elbow pain.

Be cautious with the radar gun:
Radar guns do not directly cause harm to a pitcher, however, the gun may cause the pitcher to over throw beyond their normal comfort level. This could possibly create arm strain.

Following these guidelines may keep the throwing athlete safe from the debilitating shoulder and elbow throwing injuries seen on a regular basis in physical therapy clinics.

Pitching Guidelines Chart

This information was written by Advance Rehabilitation Physical Therapy, an outpatient physical therapy group with 24 locations in Georgia and Florida. Advance Rehabilitation is a physical therapy practice that focuses on providing the highest quality rehabilitation services. They specialize in physical therapy, sports medicine, industrial rehabilitation and athletic training. Their staff includes highly-trained professionals that serve as a bridge between injury and recovery to help patients get back to pre-injury status as quickly as possible. For more information click here.

See the entire Guidelines to Prevent Throwing Injuries series here:

   Prevent Throwing Injuries

   prevent throwing injuries

throwing injuries PTandMe

prevent throwing injuries

Guidelines to Prevent Throwing Injuries

throwing injuires

In this monthly series about how to prevent throwing injuries, we examine the proper ways to exercise and prevent throwing injuries in baseball. If you have any sudden significant increase in pain, swelling, or discoloration while performing or following exercise, discontinue immediately and contact your primary care provider.


PRONE ROW
Lay on your stomach with your arm hanging off the edge toward the ground. Squeeze your shoulder blade and bring your elbow toward the ceiling while keeping your forearm perpendicular to the ground.


PRONE ROW WITH EXTERNAL ROTATION
Lay on your stomach with your arm hanging off the edge toward the ground. Turn your wrist so your palm is toward your feet. Squeeze your shoulder blade and bring your elbow toward the ceiling while keeping your forearm perpendicular to the ground. Once your arm is parallel with the ground rotate the back of your hand toward the ceiling while keeping the elbow bent.


PRONE T (HORIZONTAL ABDUCTION)
Lay on your stomach with your arm hanging off the edge toward the ground. Lift your arm straight out to your side and squeeze your shoulder blade with the palm continuing to face toward the ground.


PRONE Y (SCAPTION)
Lay on your stomach with your arm hanging off the edge toward the ground. Lift your arm at a 45 degree angle over your head with your thumb facing toward the ceiling. Squeeze your shoulder blade down and toward your spine.

This information was written by Advance Rehabilitation Physical Therapy, an outpatient physical therapy group with 24 locations in Georgia and Florida. Advance Rehabilitation is a physical therapy practice that focuses on providing the highest quality rehabilitation services. They specialize in physical therapy, sports medicine, industrial rehabilitation and athletic training. Their staff includes highly-trained professionals that serve as a bridge between injury and recovery to help patients get back to pre-injury status as quickly as possible. For more information click here.

See the entire Guidelines to Prevent Throwing Injuries series here:

   Prevent Throwing Injuries

   prevent throwing injuries

throwing injuries PTandMe

Guidelines to Prevent Throwing Injuries

GuidelinesPreventThrowingInjuries#3_FBsize

In this third intallment of our series to prevent throwing injuries, we examine the proper ways to exercise and prevent throwing injuries in baseball. If you have any sudden significant increase in pain, swelling, or discoloration while performing or following exercise, discontinue immediately and contact your primary care provider.


INTERNAL ROTATION WITH SHOULDER AT 90 DEGREES OF ABDUCTION
Attach band high up on a doorway and face away from door. Hold band and move your arm out sideways away from your body until your arm is parallel with the ground. Bend your elbow to 90 degrees and point your fist toward the ceiling. Rotate from your shoulder bringing your hand forward while keeping your arm parallel to the floor and your elbow bent to 90 degrees.


EXTERNAL ROTATION WITH SHOULDER AT 90 DEGREES OF ABDUCTION
Attach band high on a doorway and face toward the door. Hold band and move your arm out sideways away from your body until your arm is parallel with the ground. Bend your elbow to 90 degrees and point your fist toward the door. Rotate from your shoulder bringing your hand away from the door while keeping your arm parallel to the floor and your elbow bent to 90 degrees.


SHOULDER INTERNAL ROTATION AT SIDE
Attach band to the doorway at chest height. Stand perpendicular to the doorway with the arm you are exercising closest to the door. Keep your arm at your side with a towel roll under the arm and bend the elbow to 90 degrees. Bring your hand toward your stomach while keeping the elbow bent to 90 degrees.


SHOULDER EXTERNAL ROTATION AT SIDE
Attach band to the doorway at chest height. Stand perpendicular to the doorway with the arm you are exercising furthest from the door. Keep your arm at your side with a towel roll under the arm and bend the elbow to 90 degrees. Bring your hand away from your stomach while keeping the elbow bent to 90 degrees.

This information was written by Advance Rehabilitation Physical Therapy, an outpatient physical therapy group with 24 locations in Georgia and Florida. Advance Rehabilitation is a physical therapy practice that focuses on providing the highest quality rehabilitation services. We specialize in physical therapy, sports medicine, industrial rehabilitation and athletic training. Our staff includes highly-trained professionals that serve as a bridge between injury and recovery to help patients get back to pre-injury status as quickly as possible. For more information click here.

See the entire Guidelines to Prevent Throwing Injuries series here:

   Prevent Throwing Injuries

   prevent throwing injuries

throwing injuries PTandMe

repetitive strain injury

Repetitive Strain Injury (RSI)

Repetitive strain injury shoulder: Repetitive strain injury (RSI),Prevention tips for strain and injury in the workplace.

The Following are Seen as Causes of Repetitive Strain Injury:

  • The overuse of muscles in our hands, wrists, arms, shoulders, neck and back
  • The area is affected by repeated actions, which are usually performed on a daily basis over a long period
  • The repetitive actions are done in a cold place
  • Forceful movements are involved
  • Workstations are poorly organized
  • Equipment is badly designed
  • The individual commonly adopts an awkward posture
  • There are not enough rest breaks

RSI

Prevention 101: Nine Easy Ways to Reduce Your Risk of Developing Repetitive Strain Injury:

  • TAKE BREAKS when using your computer. Every hour or so, get up and walk around, get a drink of water, stretch whatever muscles are tight, and look out the window at a far off object (to rest your eyes).
  • Use good posture. If you can’t hold good posture, it probably means it’s time for you to take a break from typing. If you are perpetually struggling to maintain good posture, you probably need to adjust your workstation or chair, or develop some of the support muscles necessary for good posture.
  • Use an ergonomically-optimized workstation to reduce strain on your body.
  • Exercise regularly. Include strengthening, stretching, and aerobic exercises. Yoga and pilates may also be helpful.
  • Only use the computer as much as you have to. Don’t email people when you could walk down the hall or pick up the phone and talk to them. It’s not only better for your hands – it’s friendlier. Think before you type to avoid unnecessary editing.
  • Don’t stretch for the hard-to-reach keys, e.g. BACKSPACE, ENTER, SHIFT, and CONTROL… basically everything but the letters. Instead, move your entire hand so that you may press the desired key with ease. This is crucial when you are programming or typing something where non-letter keys are used extensively.
  • Let your hands float above the keyboard when you type, and move your entire arm when moving your mouse or typing hard-to-reach keys, keeping the wrist joint straight at all times. This lets the big muscles in your arm, shoulder, and back do most of the work, instead of the smaller, weaker, and more vulnerable muscles in your hand and wrist. If you find it difficult to do this, then your shoulder and back muscles are probably too weak. It is OK, and in fact a good idea, to rest your elbows/wrists when you are not typing.
  • Use two hands to type combination key strokes, such as those involving the SHIFT and CONTROL keys.
  • When writing, avoid gripping the writing utensil tightly. Someone should be able to easily pull the writing utensil out of your hand when you are writing. If your pen or pencil requires you to press too hard, get a new one (my favorite is Dr. Grip Gel Ink).

Article provided by Fit2WRK. The information noted above is a summary of one of the components of Fit2WRK.

Prevent Throwing Injuries

Guidelines to Prevent Throwing Injuries

In our second installment of “Guidelines to Prevent Throwing Injuries” we examine the proper ways to exercise and prevent throwing injuries in baseball. If you have any sudden significant increase in pain, swelling, or discoloration while performing or following exercise, discontinue immediately and contact your primary care provider.


SHOULDER ABDUCTION
Begin with your arms at your side with your palms facing forward. Raise your arm straight out to the side until they are straight overhead.


SHOULDER SCAPTION
Begin with your arms at your side. Raise your arms at a 45 degree angle creating a V shape with your arms until they are overhead.


D2 EXTENSION
Secure band to wall or top of the doorway. Pull diagonally down across your body toward your opposite hip. Make sure to keep the elbow straight. Return to the starting position with a straight elbow and repeat.


D2 FLEXION
Secure band to bottom of the doorway. Pull diagonally up across your body away from your body. Make sure to keep the elbow straight. Return to the starting position with a straight elbow and repeat.

This information was written by Advance Rehabilitation Physical Therapy, an outpatient physical therapy group with 24 locations in Georgia and Florida. Advance Rehabilitation is a physical therapy practice that focuses on providing the highest quality rehabilitation services. We specialize in physical therapy, sports medicine, industrial rehabilitation and athletic training. Our staff includes highly-trained professionals that serve as a bridge between injury and recovery to help patients get back to pre-injury status as quickly as possible. For more information click here.

See the entire Guidelines to Prevent Throwing Injuries series here:

   Prevent Throwing Injuries

   prevent throwing injuries

throwing injuries PTandMe


overtraining

Are You Overtraining?

Are You Overtraining_FBsize

Maintaining a rigorous workout schedule without allowing enough time for the body to recover, often leads to what is known as overtraining. Not only is an athlete at a higher risk for injury but overtraining can manifest itself in several other ways.

WHAT CAN CAUSE OVERTRAINING
• Sudden increase in exercise frequency
• Intensity or duration of training sessions
• Not allowing your body adequate recovery
• The length of time you have been training

SIGNS AND SYMPTOMS OF OVERTRAINING
• Persistent muscle soreness
• Elevated resting heart rate.
• Increased susceptibility to infections.
• Increased incidence of injuries.
• Irritability
• Depression
• Loss of motivation
• Insomnia
• Stop noticing progress towards training goals
• Becoming restless and losing focus
• Feeling sluggish all day

HOW TO AVOID OVERTRAINING
• Get enough sleep – this is the time when your body is able to heal the most
• Proper nutrition- get plenty of protein, fats and carbs
• Monitor stress levels

leg press

Exercise Smartly:
• Find a balance and avoid workouts that are too intense for you
• Progress workouts slowly

Allow Proper Recovery Time Between Workout Sessions:
Take one or two days between workout sessions or alternate intensity levels for each workout

Stay Active On Off Days:
• Try a less intense mode of exercise (Active Rest)
• Yoga, stretching, or foam rolling can be done on these days

Information provided by the Center for Physical Rehabilitation – Grand Rapids, MI
To learn more about the Center for Physical Rehabilitation click here.

Occupational Therapy Month

April is Occupational Therapy Month!

April OT Month_FBsize

Occupational Therapy Month is when we celebrate and recognize all of the work our OT’s do. Occupational therapists (OT) help people of all ages participate in the things they want and need to do in their homes, at work, in school and throughout the community. From a patients initial evaluation to the development and follow through of their rehabilitation plans, an OT works hard to make sure that their patient is able to return to the activities they enjoy and need to live a full and healthy life.

In an outpatient setting, some of the responsibilities of our occupational therapists may include:

  • Hand and upper extremity movement and rehabilitation
  • Teaching patients to use assistive devices to complete activities of daily living (ADL’s)
  • Rehabilitating patients recovering from stroke to regain strength, movement, and learn to accomplish ADL’s in modified ways.
  • Working with employers to create programs designed to reduce risk and injury in the workplace.
  • Helping children struggling to achieve developmental goals progress to their highest possible levels
  • Working with patients suffering from neurological conditions such as Parkinson’s to remain active.

This Occupational Therapy Month the AOTA is celebrating 100 years of helping people live their lives to the fullest.
For more info go to: www.aota.org

PTandMe therapists

Clinic Spotlight: PT & Me Therapists

Clinc Spotlight_PT&MeTherapists_FBsize

This month we are featuring stories from some of our PT & Me therapists. We asked them how they got into the awesome world of physical therapy and what they enjoy about it. These are their stories…

Kelly_wilson
Name:
Kelly Wilson, PT, DPT at University Physical Therapy – 8 locations conveniently located throughout the New River Valley in Virginia

Why did you chose physical therapy as a career?
I took an anatomy class in high school with a teacher who absolutely changed my life. I could not get enough of the curriculum and wanted to learn more about how we work and how we can make ourselves better. I stayed after school one day to ask how I could learn about this topic forever. My teacher suggested that I look into physical therapy. I started shadowing a PT in my hometown and loved it! I was hooked!

What is your favorite thing about going to work each day?
I get to work with the absolute best people on the face of the planet.


Name:
Lea Ann Rumlin, PT, Clinic Owner at DeKalb Comprehensive Physical Therapy – Lithonia, Georgia

Why did you chose physical therapy as a career? 
I had an opportunity to observe a PT in high school and found it was very interesting. I thought it was cool to observe a diverse variety of ailments in people.

What is your favorite thing about going to work each day?
I’ve been doing physical therapy for a long time, but it still feels new. I feel blessed to have the opportunity to help people.


Name:
Wendy Richards, MSPT, DPT at Port City Physical Therapy – Portland, Maine

Why did you chose physical therapy as a career? 
I wanted to be in a helping profession. Growing up in rural Maine most of the careers were either in healthcare or nursing. That is why I was drawn to physical therapy. I especially liked the stroke patient rehab and spinal rehab aspect of it. Helping people with paralysis was especially fulfilling.

What is your favorite thing about going to work each day? 
I enjoy working in a team environment. Working in an outpatient climate and helping patients to get better. Being able to resolve their limitations and improve their lives.


Name:
Jocelyn Zolna-Pitts, PT, Director at Metro Spine & Sports Rehabilitation – Chicago, Illinois

Why did you chose physical therapy as a career?
It combined my interest of medicine with sports. I was always interested in medicine and helping others.

What is your favorite thing about going to work each day?
The daily satisfaction of watching people get better. The challenge and variety of problems patients face and solving their problems through critical thinking with them. I enjoy the fact that you get to play every day at work and it’s a lot of fun!