Tag Archives: Injury Prevention

Fall Prevention Physical Therapy

Physical Therapy for Balance & Fall Prevention

“Falls are the leading cause of injury death for Americans 65 years or older. Each year, about 35–40% of adults 65 and older fall at least once.”
— Center for Disease Control

Physical Therapy for Fall Prevention
Physical therapy fall prevention programs are tailored around each individual’s needs. The length of the program is dependent on the severity of the symptoms and the goals of each individual. Most patients will follow a gradual path of three distinct phases. After an initial evaluation to determine needs and goals of patient and we will set up treatment plan with patient input. The first phase typically includes therapeutic interventions designated to decrease symptoms and the establishment of a Home Exercise Program (HEP). We will then Continue the use of therapeutic interventions with the addition of ADL modifications, and energy conservation techniques. Finally we will continue the program until the patient’s goals are met.

The main objectives in a fall prevention program are to:

  • Increase independence with Activities of Daily Living (ADLs)
  • Increase independence with functional mobility
  • Decrease fall risk
  • Prevent future fall
  • Increase safety

Pain Relief
Our PTandMe licensed physical therapists are skilled in helping patients significantly reduce the risk of falls so that seniors can continue to age independently. If you or someone you know may benefit from a fall prevention program – call a clinic near you today and see what options are available for you! To find a PTandMe partnering location in your area click here.

Safe Lifting Practices for Back Injury Prevention

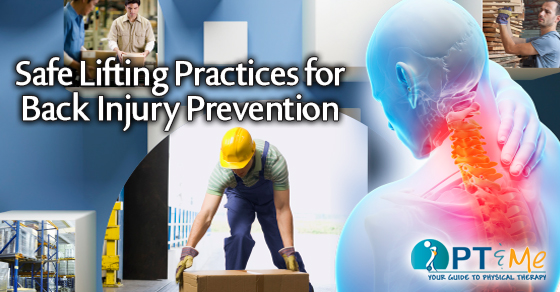
Lifting Safety: Safe lifting practices for back injury prevention.

Whether at home or at work safe lifting practices can keep your back healthy and safe. Before lifting heavy objects decide how you will lift carry & place the item before you pick it up. Test the weight of the load by moving or tipping it. Figure out if you can break the load down by placing the contents of large containers into a number of smaller ones before moving them. Is the path clear? What is the weight of the load? How much stress will be placed upon your back? Is there traffic, a tripping hazard, a doorway to go through, or a stairway to go up or down? Avoid carrying an object that requires two hands to hold, either up or especially down a flight of stairs. Use the elevator. Plan a rest stop, if needed. Knowing what you’re doing and where you’re going will prevent you from making awkward movements while holding something heavy. Clear a path, and if lifting something with another person, make sure both of you agree on the plan.

KEY STEPS FOR SAFE LIFTING PRACTICES

Establish a Base of Support: Use a wide, balanced stance with one foot in front of the other. Make sure that you have firm footing and that your feet are a shoulders-width apart. This staggered stance gives you the stability of not falling over and being able to secure the load.

Keep Your Eyes Up: Looking slightly upward will help you maintain a better position of the spine. Keeping your eyes focused upwards helps you keep your back straight.

Get a Good Grip: With your palms and make sure you have an adequate hold on the object. Be certain you will be able to maintain a hold on the object without having to adjust your grip later. You can use gloves to help maintain an adequate grip, but don’t rely on gloves because they can desensitize the fingers and make you unable to feel the object.

Lift Gradually with Your Legs: Without using jerky motions. By using your leg strength, your chance of lower back injury is greatly reduced.

Tighten you stomach muscles: As you begin the lift and keep you head and shoulders up.

Pivot – Don’t Twist: Move your feet in the direction of the lift. This will eliminate the need to twist at the waist.

Weight: A lighter load normally means a lesser risk of injury. The weight of the object should be within the capacity of the person to handle safely.

Handling: It is easier to pull or push a load than it is to lift, put down or carry.

Keep the Load Close: Holding a 20lb object with your hands 20 inches from the body creates more compressive force on your low back than holding it 10 inches away. This is because the muscles in your back have to work to counterbalance the weight when it is further from the body. As the compressive force on your low back increases, so does the risk of muscle strains, ligament sprains and damage to the disks in the spine.

Frequency: The more times a load is handled, the more tired the muscles become, making it easier for the person to be injured.

Distance: The farther the load has to be moved, the greater the risk of injury.

Duration (TIME): Where the job involves repetitive movements, reducing the time spent on handling will help to ensure the movements are not causing unnecessary strain.

Forces Applied: Forces should be applied smoothly, evenly and close to the body. Forces exerted should be well within the capacity of the person, and the person should maintain proper posture.

Nature of the Load: Loads that are compact, stable, easy to grip, and capable of being held close to the body are much easier to handle.

Terrain: Rough ground, steep slopes, slippery and uneven floors, stairs and cluttered floors make moving a load awkward and increase the chance for injury.

Environment (Climate & Lighting): If it is too hot, too humid, too cold or the lighting is inadequate, the capacity to work safely is reduced.

Condition of the Workplace: Safe and comfortable working conditions, with adequate space to perform the task, and tools and equipment that are well-maintained, make their job safer.

Age/Gender: Young and old workers alike may be at an increased risk of injury from manual materials handling activities. Ensure abilities of employees are in line with functional job requirements.

Training: Proper training for the specific task is vital to reduce injury.

Team Lifting: If one person cannot lift or move a heavy, large or awkward object safely, organize a team lift. Team lifting reduces the risk of injury, reduces fatigue and makes the task much easier.

Raise/Lower Shelves: The best zone for lifting is between your shoulders and your waist. *Put heavier objects on shelves at waist level, lighter objects on lower or higher shelves.

Avoid Lifting from the Floor: Lifting from the floor can greatly increase your risk of injury for two reasons. Firstly, it is difficult to bring objects close to your body when picking them up from the floor, especially large objects where your knees can get in the way. Secondly, your low back must now support the weights of your upper body as you lean forward, in addition to supporting the weight of the item you are lifting. Lifting the same 20lbs from the floor more than doubles the amount of force on your low back when compared with lifting is from waist height. Even a one pound object lifted from the floor increases you risk of injury if you use a bent over posture.

Get Help When You Need It: Don’t try to lift heavy or awkward loads on your own. Even though the muscles in your upper body may be strong enough to handle the load, the muscles, ligaments and disks in your lower back may be injured because of the additional forces they have to withstand. Get help from a co-worker, and whenever possible, use a cart, hand truck or other mechanical device to move the load for you.

This content was written by Fit2WRK who has partnered with PT and Me to give a comprehensive look into the services physical and occupational therapists provide. For more information on Fit2WRK click here.

strength training

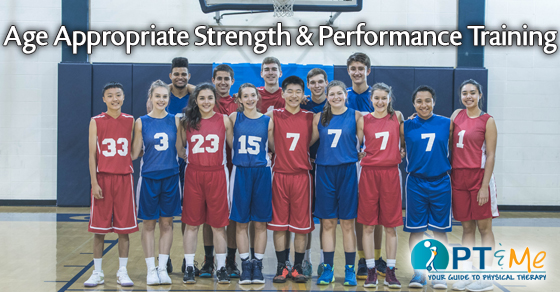
Age Appropriate Strength and Performance Training

In recent years there has been discussion on training for our adolescent athletes and what is appropriate, whether it be how much, how soon, how specialized? Here are some answers to common strength training questions we hear:

When Can My Athlete Start Lifting Weights?
The NSCA’s position statement states pre-adolescence (7-8 y/o) is a safe age to begin resistance training with graduated modalities and loads. Basically, if the athlete is ready for organized sports, they are ready for some kind of resistance training.

Why Can’t I Just Buy a Blu-Ray Workout for My Adolescent to Train By?
No athlete is the same, and doing a cookie-cutter workout without properly screening for potential injury risk would be negligent. The risk is too great to potentially hurt an athlete by trying to perform exercises their bodies cannot physically handle.

What Should I Look for with Overtraining?
Ongoing decreased performance on field. Often injured or sick. Disengagement from sport and school. Mood swings. Physically tired all the time. Sleep issues. Overreactive emotional response to failure. Depression. Nutrition issues.

A strength training and conditioning specialist can screen each athlete’s movements in order to determine a baseline level of movement and strength. They then develop exercises and drills that will enhance the good movement qualities while addressing any bad motor patterns that may exist. Main components that are often noticed by trained professionals are mobility(flexibility) and stability (strength) issues.

For more on strength & conditioning or to inquire about training with the Center for Physical Rehabilitation at the Academy for Sports & Wellness, please visit: www.pt-cpr.com/academy

PREHAB Knee Replacement

PREHAB Move to Improve Your Goals: Total Knee Replacement

PREHAB Home Preparation
Before total knee replacement surgery there are a few simple things you can do in your home to make it safer and more comfortable during recovery.

  • Consider keeping a cordless phone near you or carry your cell phone in your pocket.
  • Move furniture to keep a clear wide path to your kitchen, bathroom and bedroom.
  • Remove throw rugs that may cause you to slip or trip. Tape down any loose edges of large area rugs that cannot be removed. Make sure extension cords are out of traffic areas or tape them down if needed.
  • Wear rubber sole shoes to prevent slipping.
  • Keep commonly used items in your home at waist level within easy reach. This will prevent you from bending over to reach items. Use a reacher to grab objects and avoid excessive bending at the knee.
  • Make sure there is adequate lighting in the house. Add night lights in hallways, bedrooms, and bathrooms.
  • It may be helpful to have temporary living space on the same floor if your bedroom/bathroom is located on the second floor of your home. Walking up/down stairs will be more difficult immediately following surgery and could increase your risk for falls.
  • Arrange for someone to collect your mail and take care of pets or loved ones if necessary.
  • Prepare frozen meals in advance to assist you with cooking.
  • Stock up on groceries, toiletries, and any needed medications you might need.
  • A shower chair or a tub bench will make bathing much easier. Do not take soak baths until your physician allows you to do so.
  • An elevated toilet seat will be helpful with toilet transfers and with following post surgical precautions or guidelines.
  • Assistive devices for dressing such as a reacher, extended shoe horn and / or sock aid may be necessary during your post operative recovery.

While it’s important to prepare your home before surgery, PREHAB should also include physical therapy. Physical therapists will work with patients to create an exercise program before surgery that can help improve performance and decrease recovery times after a total knee replacement. Talk to a PT near you and learn about the benefits of PREHAB before total joint replacements.

Industrial Rehab Physical Therapy PTandMe

Health Aging for a Sustainable Workforce

What Can Employers Do to Protect an Aging Workforce?

Employers can start by revisiting job descriptions and knowing every detail each work task entails in order to help prevent costly and unnecessary workers’ compensation claims. Meanwhile, they should continue to promote health and wellness programs for all employees. Because older workers bring many benefits, from their experience and knowledge to their motivation and good work ethic, the advantages of employing older workers will outweigh the possible worker’s compensation claims, with preparation and planning.

Companies must utilize and implement preventative safety efforts. Specifically, companies should develop slip-and-fall prevention tactics, considering that slips and falls account for 33 percent of all injuries sustained by workers 65 and older, according to the National Safety Council. Safety training should consist of more than just scripted lectures, distributed
pamphlets and orientation videos. Employees should be taken through the physical movements and tasks that are specific to their job description–a hands-on learning experience. Because younger workers account for the majority of accidents while older workers have longer recovery periods, safety training benefi ts all employees and the employer. Bring in external experts such as physical therapists from the community to teach proper techniques and protocols.

  • Modification of work environment
  • Ergonomics and wellness programs
  • Industrial Athlete approach to exercise
  • Return to work accommodations

AGING WORKFORCE SERVICES:

Education:
A full battery of educational programs are available for both the professional staff of an employer to that of the general employee population such as slip and fall or back injury prevention.

Preventative Maintenance Testing:

A brief test – approx. 15 minutes that looks at the essential and critical factors of the job – usually body part specific and set up as a repeated test – every three to four months on a high risk job position – looking for trends or patterns of degradation of range of motion or strength of employees.

Fitness Programs for the Industrial Athlete:
Detailed stretching programs are customized per high risk job based upon historical injury determinations. The program is set up for employee participation prior to work, returning from lunch and at the end of the workday.

Physical Ability Maintenance:
A custom built strengthening program designed to maintain the physical abilities necessary to perform everyday work.

For more information about staying healthy and injury free in the workplace – try the links below:


Adapted from Fit2wrk Article 1.10   For more information on Fit2wrk click here.

postural hypotension PTandMe

Postural Hypotension: What It Is and How to Manage It

Postural hypotension (or orthostatic hypotension) is when your blood pressure drops when you go from lying down to sitting up or from sitting to standing. When your blood pressure drops, less blood can go to your organs and muscles. This can make you likely to fall.

What are the symptoms?
Although many people with postural hypotension have no symptoms, others do. These symptoms can differ from person to person and may include:

  • Dizziness or lightheadedness
  • Feeling about to faint, passing out or falling
  • Headaches, blurry or tunnel vision
  • Feeling vague or muddled
  • Feeling pressure across the back of your shoulders or neck
  • Feeling nauseous or hot and clammy
  • Weakness or fatigue

When do symptoms tend to happen?
When standing or sitting up suddenly

  •  In the morning when blood pressure is naturally lower
  • After a large meal or alcohol
  • During exercise
  • When straining on the toilet
  • When you are ill
  • If you become anxious or panicky

What causes postural hypotension?
Postural hypotension may be caused by or linked to:

  • High blood pressure
  • Diabetes, heart failure, atherosclerosis or hardening of the arteries
  • Taking some diuretics, antidepressants or medicines to lower blood pressure
  • Neurological conditions like Parkinson’s disease and some types of dementia
  • Dehydration
  • Vitamin B12 deficiency or anemia
  • Alcoholism
  • Prolonged bed rest

What can I do to manage my postural hypotension?

  • Tell your healthcare provider about any symptoms
  • Ask if any of your medicines should be reduced or stopped
  • Get out of bed slowly. First sit up, then sit on the side of the bed, then stand up
  • Take your time when changing position, such as when getting up from a chair
  • Try to sit down when washing, showering, dressing or working in the kitchen
  • Exercise gently before getting up (move your feet up and down and clench and unclench your hands) or after standing (march in place)
  • Make sure you have something to hold onto when you stand up
  • Do not walk if you feel dizzy
  • Drink 6-8 glasses of water or low-calorie drinks each day, unless you have been told to limit your fluid intake
  • Avoid taking very hot baths or showers
  • Try sleeping with extra pillows to raise your head

This information was written by Proactive Physical Therapy, an outpatient physical therapy clinic in Sioux Falls, South Dakota. At ProActive Physical Therapy, their number one priority is the patient. They strive to provide individualized treatment with hands-on, compassionate care. They do not rush their patients or their clinicians. Rather, they perform comprehensive evaluations and encourage patient input for treatment planning and goal setting. For more information click here.

throwing injuries PTandMe

Guidelines to Prevent Throwing Injuries

In this monthly series, we examine the proper ways to exercise and prevent throwing injuries in baseball. If you have any sudden significant increase in pain, swelling, or discoloration while performing or following exercise, discontinue immediately and contact your primary care provider.


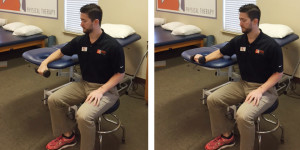
WRIST EXTENSION
Start with the arm supported on a table and your wrist facing toward the ground. Hold the weight off the edge of the table and bring the back of your hand toward the ceiling.


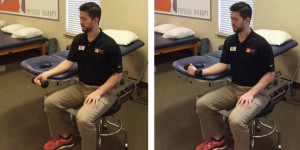
WRIST FLEXION
Start with the arm supported on a table and your wrist facing toward the ceiling. Hold the weight off the edge of the table and bring your palm toward the ceiling.

ASMI GUIDELINES TO HELP PROTECT PITCHERS FROM SHOULDER & ELBOW THROWING INJURIES:

Don’t throw too much:
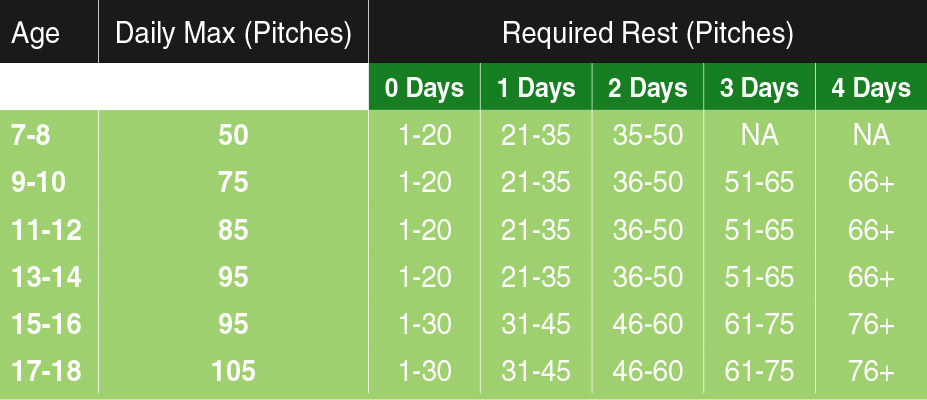
Daily, weekly and annual overuse is the greatest risk to a pitcher’s arm health. Numerous studies have shown that pitchers who throw more pitches per game and those who do not adequately rest between appearances are at an elevated risk of injury. While medical research does not identify optimal pitch counts, pitch count programs have been shown to reduce the risk of shoulder and elbow injury in Little League Baseball by as much as 50% (Little League, 2011). The most important thing is to set limits for a pitcher and stick with them throughout the season.

Don’t pitch through arm fatigue:
Individuals are 36 times more likely to develop shoulder and elbow injuries when routinely pitching with arm fatigue.

Don’t pitch more than 100 innings per year:
If an athlete throws over 100 innings they are 3.5 times more likely to be injured than those who did not exceed 100 innings pitched.

Don’t throw more than 8 months per year:
Athletes who throw > 8 months per year are 5 times as likely to suffer an injury requiring surgery of the elbow or shoulder. Pitchers should refrain from throwing for at least 2-3 months per year and avoid competitive pitching for at least 4 months per year.

Don’t pitch on consecutive days:
Pitchers who pitch on consecutive days have more than 2.5 times greater risk of experiencing arm pain.

Don’t play catcher following pitching:
If the player catches following pitching they are 2.7 times more likely to suffer a major arm injury.

Don’t play on multiple teams at the same time:
There is increased risk of injury due to the difficulty in monitoring pitch limits and rest time. If the player is on multiple teams, make meticulous efforts to keep track of the amount of pitches thrown to allow adequate rest.

Don’t forget the shoulder in strength and conditioning programs:
Numerous studies have shown that deficits in upper extremity strength and mobility are strongly correlated to serious arm injuries. Shoulder and forearm strengthening exercises can build strength, endurance and motor control which can prevent injury.

Be cautious with throwing curve balls and sliders:
While existing research has not consistently shown a strong connection between the curveball and injuries, Yang et al., found that amateur pitchers who threw curveballs were 1.6 times more likely to experience arm pain while pitching and Lyman et al, found that youth pitchers who throw sliders are 86% more likely to experience elbow pain.

Be cautious with the radar gun:
Radar guns do not directly cause harm to a pitcher, however, the gun may cause the pitcher to over throw beyond their normal comfort level. This could possibly create arm strain.

Following these guidelines may keep the throwing athlete safe from the debilitating shoulder and elbow throwing injuries seen on a regular basis in physical therapy clinics.

Pitching Guidelines Chart

This information was written by Advance Rehabilitation Physical Therapy, an outpatient physical therapy group with 24 locations in Georgia and Florida. Advance Rehabilitation is a physical therapy practice that focuses on providing the highest quality rehabilitation services. They specialize in physical therapy, sports medicine, industrial rehabilitation and athletic training. Their staff includes highly-trained professionals that serve as a bridge between injury and recovery to help patients get back to pre-injury status as quickly as possible. For more information click here.

See the entire Guidelines to Prevent Throwing Injuries series here:

   Prevent Throwing Injuries

   prevent throwing injuries

throwing injuries PTandMe

McKenzie Method

McKenzie Method: Mechanical Diagnosis and Treatment

McKenzieMethod2_FBsize

The McKenzie Method is a philosophy of active patient involvement and education that is trusted and used by practitioners and patients all over the world for back, neck and extremity problems.

McKenzie Method – Three Steps to Success:

1. A logical step-by-step process to evaluate the patient’s problem quickly. This mechanical examination can “classify” most patient conditions by the level of pain or limitation that results from certain movements or positions. A McKenzie assessment can eliminate the need for expensive and/or invasive procedures.

2. McKenzie treatment prescribes a series of individualized exercises. The emphasis is on active patient involvement, which minimizes the number of visits to the clinic. For patients with more difficult mechanical problems, a certified McKenzie clinician can provide advanced hands-on techniques until the patient can self administer.

3. By learning how to self-treat the current problem, patients gain hands-on knowledge on how to minimize the risk of recurrence and to rapidly deal with recurrence if it occurs. The likelihood of problems persisting can more likely be prevented through self-maintenance.

prevent throwing injuries

Guidelines to Prevent Throwing Injuries

throwing injuires

In this monthly series about how to prevent throwing injuries, we examine the proper ways to exercise and prevent throwing injuries in baseball. If you have any sudden significant increase in pain, swelling, or discoloration while performing or following exercise, discontinue immediately and contact your primary care provider.


PRONE ROW
Lay on your stomach with your arm hanging off the edge toward the ground. Squeeze your shoulder blade and bring your elbow toward the ceiling while keeping your forearm perpendicular to the ground.


PRONE ROW WITH EXTERNAL ROTATION
Lay on your stomach with your arm hanging off the edge toward the ground. Turn your wrist so your palm is toward your feet. Squeeze your shoulder blade and bring your elbow toward the ceiling while keeping your forearm perpendicular to the ground. Once your arm is parallel with the ground rotate the back of your hand toward the ceiling while keeping the elbow bent.


PRONE T (HORIZONTAL ABDUCTION)
Lay on your stomach with your arm hanging off the edge toward the ground. Lift your arm straight out to your side and squeeze your shoulder blade with the palm continuing to face toward the ground.


PRONE Y (SCAPTION)
Lay on your stomach with your arm hanging off the edge toward the ground. Lift your arm at a 45 degree angle over your head with your thumb facing toward the ceiling. Squeeze your shoulder blade down and toward your spine.

This information was written by Advance Rehabilitation Physical Therapy, an outpatient physical therapy group with 24 locations in Georgia and Florida. Advance Rehabilitation is a physical therapy practice that focuses on providing the highest quality rehabilitation services. They specialize in physical therapy, sports medicine, industrial rehabilitation and athletic training. Their staff includes highly-trained professionals that serve as a bridge between injury and recovery to help patients get back to pre-injury status as quickly as possible. For more information click here.

See the entire Guidelines to Prevent Throwing Injuries series here:

   Prevent Throwing Injuries

   prevent throwing injuries

throwing injuries PTandMe

Isokinetic Devices

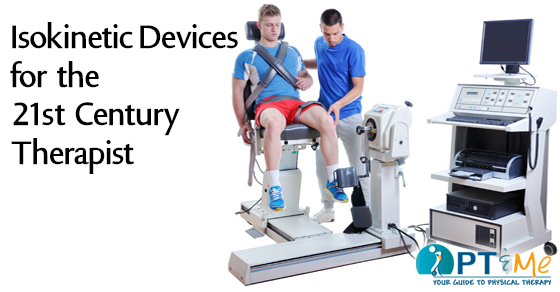
Isokinetic Devices for the 21st Century Therapist

Isokinetic Devices

Isokinetic devices have had their time in the spotlight of the rehab world. Like an actor past his prime, these monstrous machines mostly sit in dark lonely corners collecting dust. Some get used regularly but only as a place for sitting and storing odds and ends. However, companies such as CSMi (Computer Sports Medicine Inc.) among others have revived this once proud and prominent piece of equipment and have applied modern technology and rehab principles to bring about a new golden age of isokinetic devices and rehab.

Historically, isokinetics was introduced in the late 1970s and hit it’s stride in the 1980s through the 90s. Various protocols were created in this time and have been researched extensively creating the body of knowledge we now have. Unfortunately, isokinetics lost favor as healthcare laws changed and the industry started the search for more low-cost treatment regimens.

ISOKINETIC DEVICES TESTING
There are now fewer therapists who know how to use the equipment and most that do are unaware of the improvements that have been made over the last twenty years. Historically, joints are measured at two or three varying speeds but only in the concentric mode of contraction. While this is still the gold standard of testing, it fails to assess the all important eccentric mode of contraction. Recently, CSMi introduced the interrupted stoke test on their machine, the Humac Norm, which allows the therapist to separate concentric and eccentric modes. Our muscles function as eccentric controllers of motion and the ability to test this provides us with a better view into the muscle’s strength and function.

There are other testing modes available as not all patients are appropriate for isokinetic testing. Isometric testing is something all therapists use daily in the form of manual muscle testing(MMT). However, this is not a precise measurement and can vary between therapists. Testing a patient isometrically on a machine is a safe, effective and precise test for your older, untrained and post-surgical patients. It provides an exact amount of torque as compared to the MMT 5-point system. Additionally, proprioception can be assessed for either velocity or joint position matching.

TREATMENT
In addition to testing, isokinetic devices offer various treatment modes are where these machines show their true capability. Continuous Passive Motion can be utilized for regaining range of motion, reducing swelling and pain, reducing apprehension and muscle guarding and regaining musculotendonous mobility.

Active Assisted Programs can be utilized to regain end-range motion and multi-angle isometrics can be utilized to increase joint stability and neuromuscular control within the entire available range of motion. Also, proprioception training can be utilized to enhance positional and motion control.

Strength training with eccentric loading allows for targeted strengthening by isolating the eccentric beginning in slower speeds and progressing into deceleration training to mimic plyometric loading.

Isotonic strengthening programs are available for various purposes. One is power training which is utilized to increase concentric explosiveness. Another is used to prepare patients for an independent gym program. Finally, dynamic isotonic control training includes the ability to load the concentric and eccentric motions at different torques and utilizes games and other programs as visual feedback to the patient.

ARGUMENTS AGAINST ISOKINETICS
One argument against isokinetics concerns patellofemoral, post-op ACL and knee osteoarthritis patients. Open chain knee extension has been labeled public enemy number one for these patients and while this has been examined extensively, steps such as limiting the range of motion, using anti-shear devices and techniques, altering patient positioning and matching the appropriate treatments to the patient reduces shearing and compression, improves safety and ultimately debunks this myth.

Now, I know that critics of isokinetics will also argue that isolating muscles is not functional. That would be true if a therapist utilized these machines as the sole treatment. But by incorporating it into an eclectic approach, patient outcomes are maximized. Your lower extremity patients will still perform scapular and thoracic control exercises and you will still strengthen the core. Soft tissue work and joint mobilization will still be needed and functional training must still occur. However, if one link in the chain is weak, the entire chain will fail. Utilizing these machines throughout the course of rehab to find and isolate those weak links is what will take your patient’s recovery of function to the next level. This is true for all of your extremity patients, nit just knees. Remember, a functional movement cannot occur with a dysfunctional or unbalanced segment.

This information was written by Daniel Bodkin, PT, DPT, ATC – STAR Physical Therapy, Columbia (North), Tennessee
Established in 1997 with one clinic and one mission – to serve. Today, STAR Physical Therapy has grown to offer that direct service in more than 60 clinics, and while they’ve grown, one thing that has not changed is their commitment to you, their communities, and their employees. Their foundational mission is “To Serve.” Their commitment to the patient and physician is to provide clinicians that are “great mechanics of the human body™.” For more information click here.